BridalBuddy User Guide
BridalBuddy is a desktop application for managing contacts, designed for optimal use through a text-based interface while retaining the advantages of a visual and mouse-based interface. It is an app targeted at wedding planners to help them streamline guest and vendor management for their clients.
As wedding planners, we understand that you may frequently encounter challenges in managing the countless guests and vendors involved in the planning process. That's why we've created BridalBuddy just for you. With BridalBuddy, you'll have an easy and effective solution for managing your guest lists and vendor information seamlessly, so that you can concentrate on delivering an unforgettable experience your clients will never forget.
With BridalBuddy, you can easily:
- Add, update, and keep track of every detail of your guests and vendors.
- Filter through your contact list to retrieve important details quickly.
- Access real-time wedding statistics for an instant snapshot of guest attendance and vendor counts.
To discover more about what BridalBuddy has to offer, continue reading the rest of this comprehensive user guide.
Table of Contents
- Helpful Guidelines for the User Guide
- Quick Start
- Tutorial for Beginners
- Features
- FAQ
- Known Issues
- Command summary
- Glossary
Helpful Guidelines for the User Guide
Interpreting symbols
This section explains the symbols that you will find in the rest of the User Guide.
| Symbol | Meaning |
|---|---|
| ⚠️ | Important information! Please read them carefully. |
| ℹ️ | Information that you should take note of. |
| 💡 | Additional useful tips. |
Searching for what you need
This section tells you what information you will find in each of the sections of this guide. Feel free to skip to the sections which you need most.
- Quick Start teaches you how to set up BridalBuddy.
- Tutorial for Beginners walks you through the basic features of BridalBuddy to get you started.
- Features helps you understand how all our features work.
- FAQ clarifies the doubts that many of our users have.
- Command Summary summarises all our features for easy reference.
- Glossary explains the definitions of any technical terms used in this guide.
- Back to Top gives you a convenient shortcut to go back to the table of contents.
Quick Start
Ensure you have Java
17or above installed in your Computer. Click here to download Java17if you do not already have it installed.ℹ️ To check if you have Java
17installed, simply runjava -versionon a command terminal to find out.Download the latest
.jarfile from here.Copy the file to the folder you want to use as the home folder for your BridalBuddy application.
Open a command terminal, navigate to the folder you put the jar file in, and use the
java -jar bridalbuddy.jarcommand to run the application.💡 If you need any help opening a command terminal, you may refer to the relevant information here (for Windows users) or here (for macOS users).
💡 If you need any help with navigating to the folder with the jar file, you may refer to the relevant information here (for Windows users) or here (for macOS users).
An interface similar to the below should appear in a few seconds. Note how the app contains some sample data.
Type the command in the command box and press Enter to execute it. e.g. typing
helpand pressing Enter will open the help window.
Some example commands you can try:list: Lists down all guests invited to the wedding on the guest list and all vendors involved in the wedding on the vendor list.add_guest n/John Doe p/98765432 e/johnd@example.com a/311, Clementi Ave 2, #02-25 rsvp/A r/H t/friends t/owesMoney: Adds a guest namedJohn Doeto the guest list.delete_vendor 3: Deletes the 3rd vendor shown in the current vendor list.exit: Exits the app.
For a comprehensive tutorial on using BridalBuddy to manage your guest and vendor lists as a wedding planner, check out the Tutorial for Beginners. Alternatively, if you’d like to explore the application independently, refer to the Features section below for detailed information on each command.
Tutorial for Beginners
If you are new to BridalBuddy, this section will walk you through all the most basic features of BridalBuddy and will make sure you know everything you need to get started. For this tutorial section, you are highly encouraged to use exactly the sample commands provided for each tutorial, and only start trying out the commands on your own after going through the Features section.
Tutorial Contents
Let us explore the most basic features of BridalBuddy's from the perspective of a wedding planner. When you open up the application for the first time, you will see the interface below, with some sample guest and vendors on the guest list and the vendor list respectively.
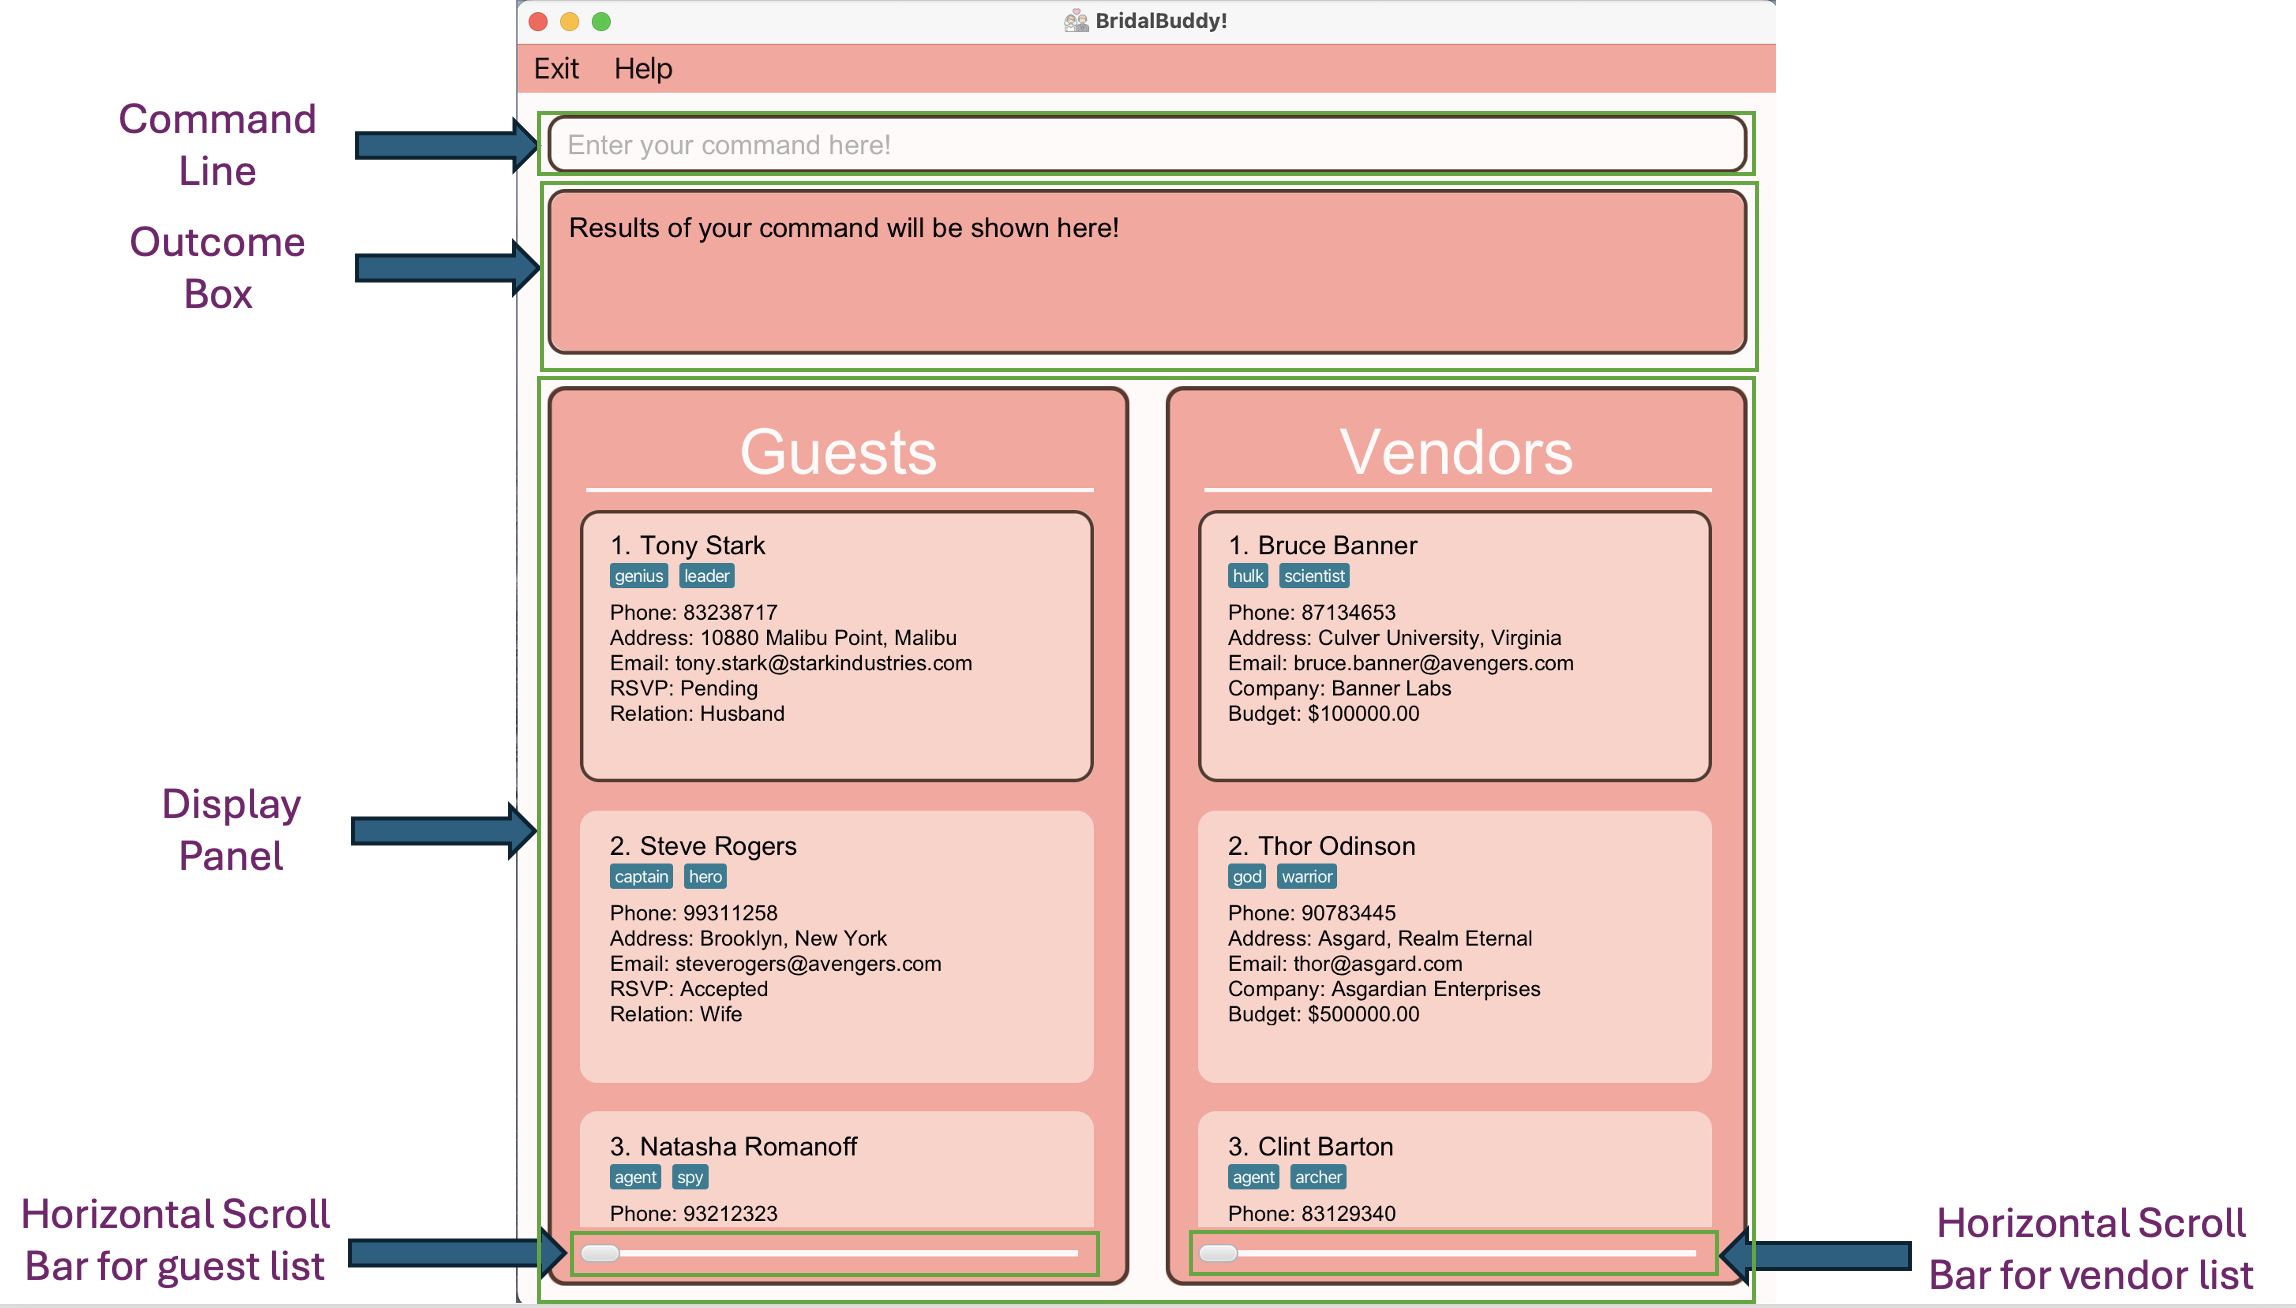
At the top of the screen, there is a text box we will refer to as the Command Line. This is where you type in your commands to BridalBuddy.
To confirm your instructions, simply press the Enter key on your keyboard.
Below the Command Line is the Outcome Box, which will tell you the outcome of the commands you have entered, as well as other relevant information related to that command.
Finally, below the Outcome Box is the Display Panel, which will contain the guest list and the vendor list for the wedding that you are planning.
💡 After entering the commands, if the cursor disappears from the Command Line, you can always press the Tab key on your keyboard a few times to bring the cursor back to the Command Line and continue typing instead of having to click on the Command Line with the mouse.
Starting a fresh template
In order to get ready to use BridalBuddy, let's first remove the existing sample guests and vendors on our guest list and vendor list.
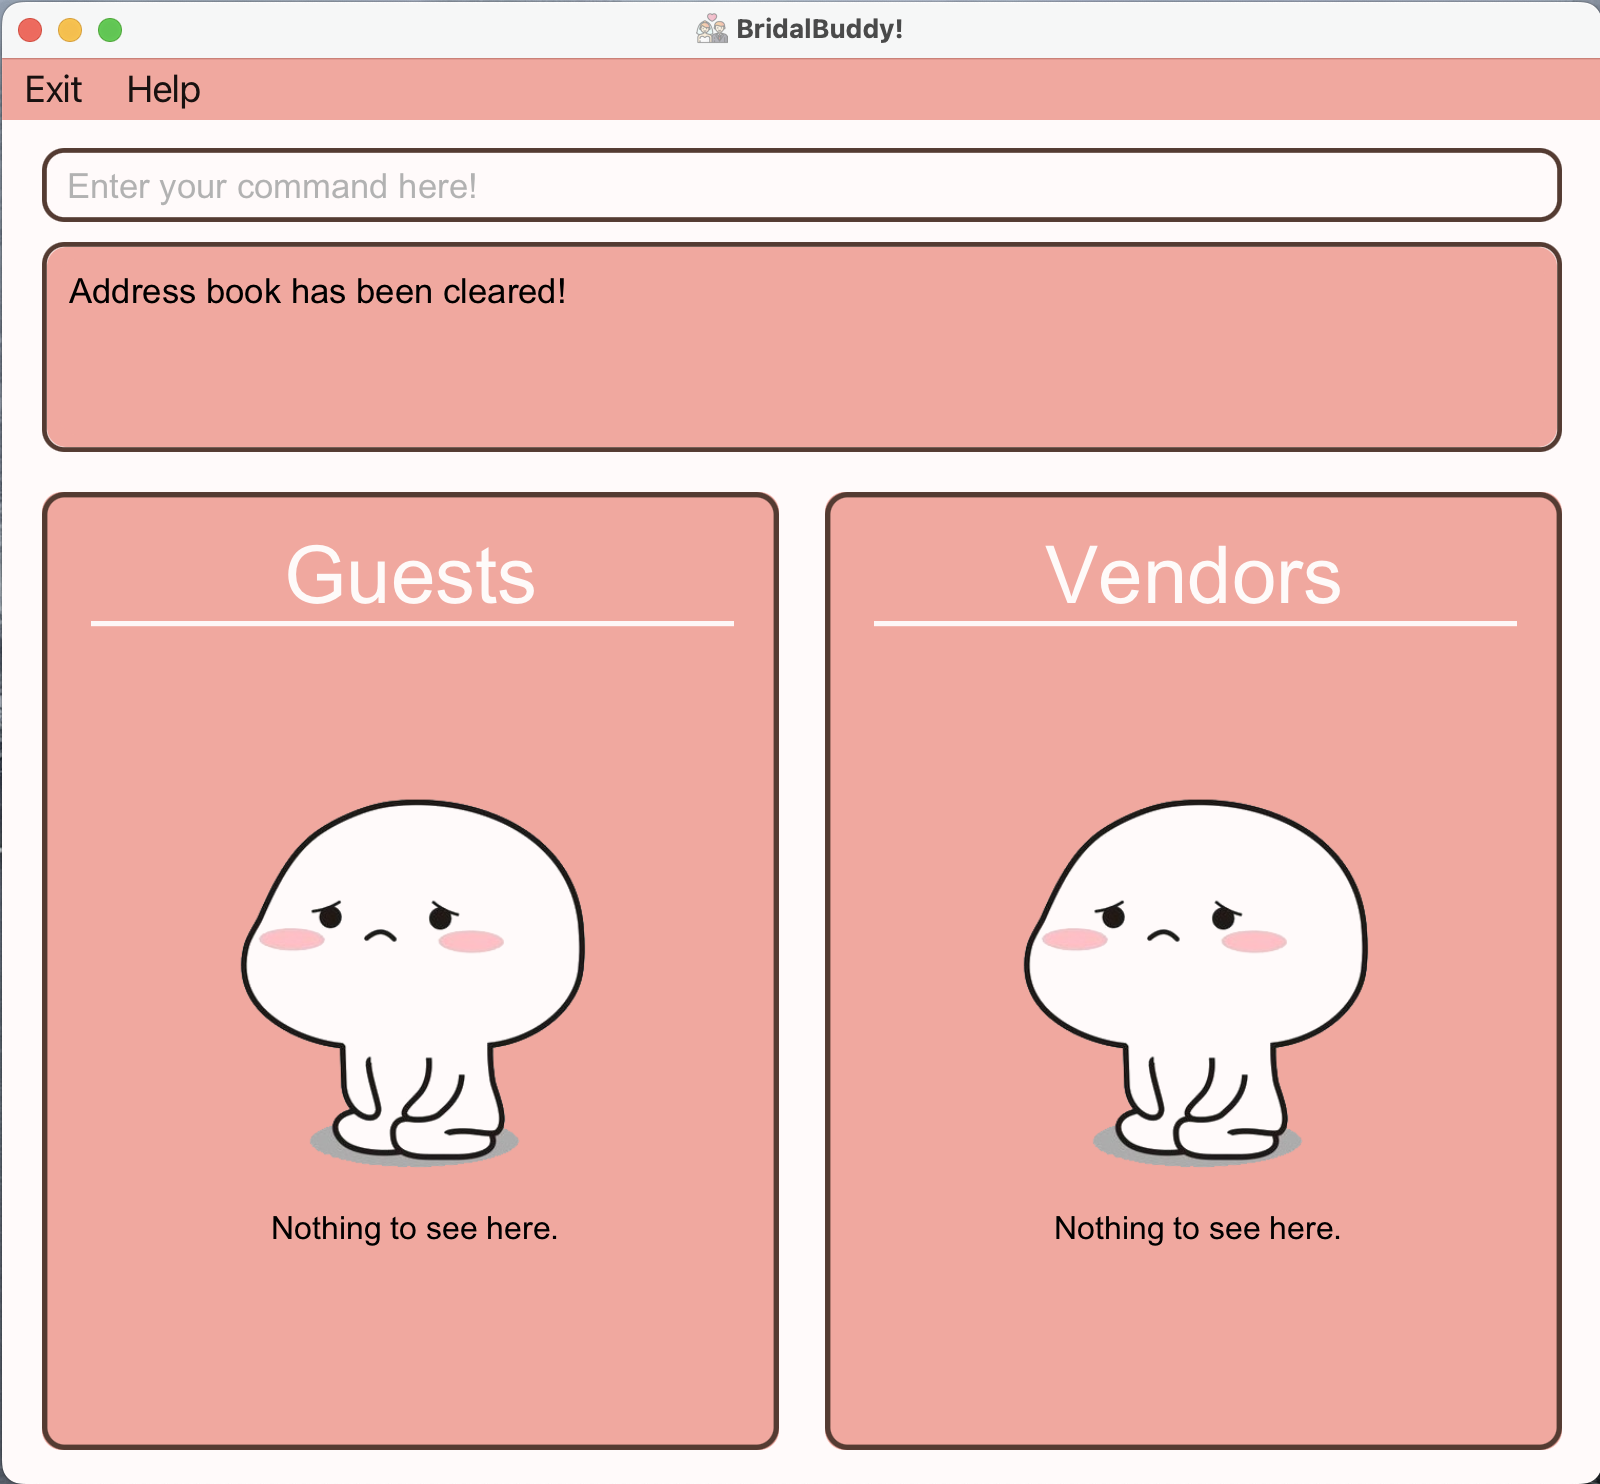
All we have to do is to enter the command clear in the Command Line, and both the guest list and the vendor list will be emptied and ready for you to plan a new wedding.
💡 Remember to hit the Enter key on your keyboard to confirm an instruction/command to BridalBuddy.
Once successful, you should see the following on your screen:
Adding guests
Now let's say your customer, the groom, sends you the first guest he wishes to invite, and we want to add him to the guest list of the wedding.
Let us familiarise ourselves with the add_guest command, which you will need in order to add guests to the guest list.
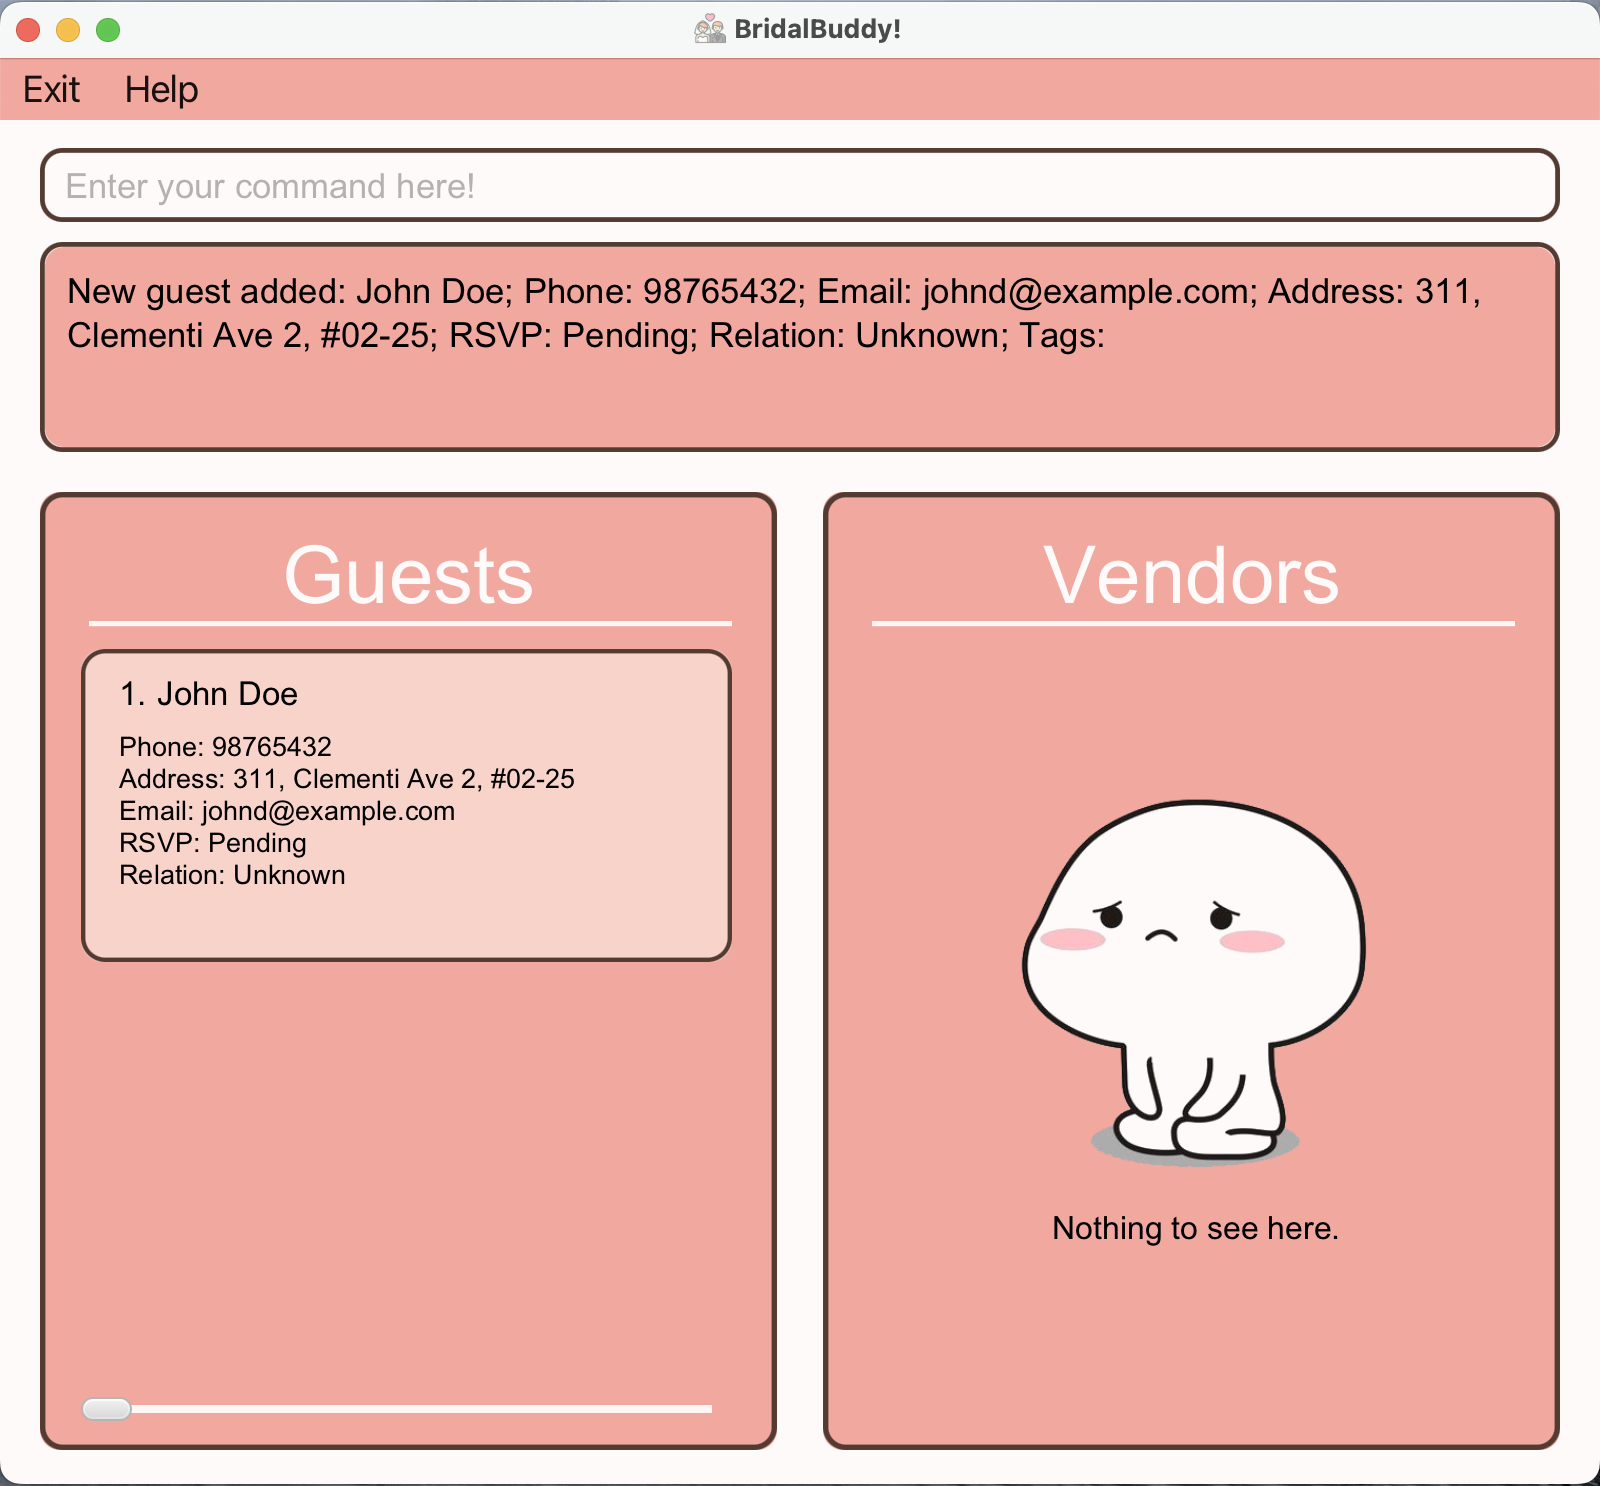
Let's try entering the following command in the Command Line: add_guest n/John Doe p/98765432 e/johnd@example.com a/311, Clementi Ave 2, #02-25.
This means you are adding a new guest, with the name John Doe, phone number 98765432, email johnd@example.com and address 311, Clementi Ave 2, #02-25 to the guest list.
Once successful, you should see the following on your screen:
For more details on the add_guest command, such as the additional optional fields you can classify a guest with, we encourage you to refer to Adding a new guest to the guest list
Adding vendors
Let us now add a vendor to the list of vendors you are intending to collaborate with, and familiarise ourselves with the add_vendor command, which you will need in order to add vendors to the vendor list.
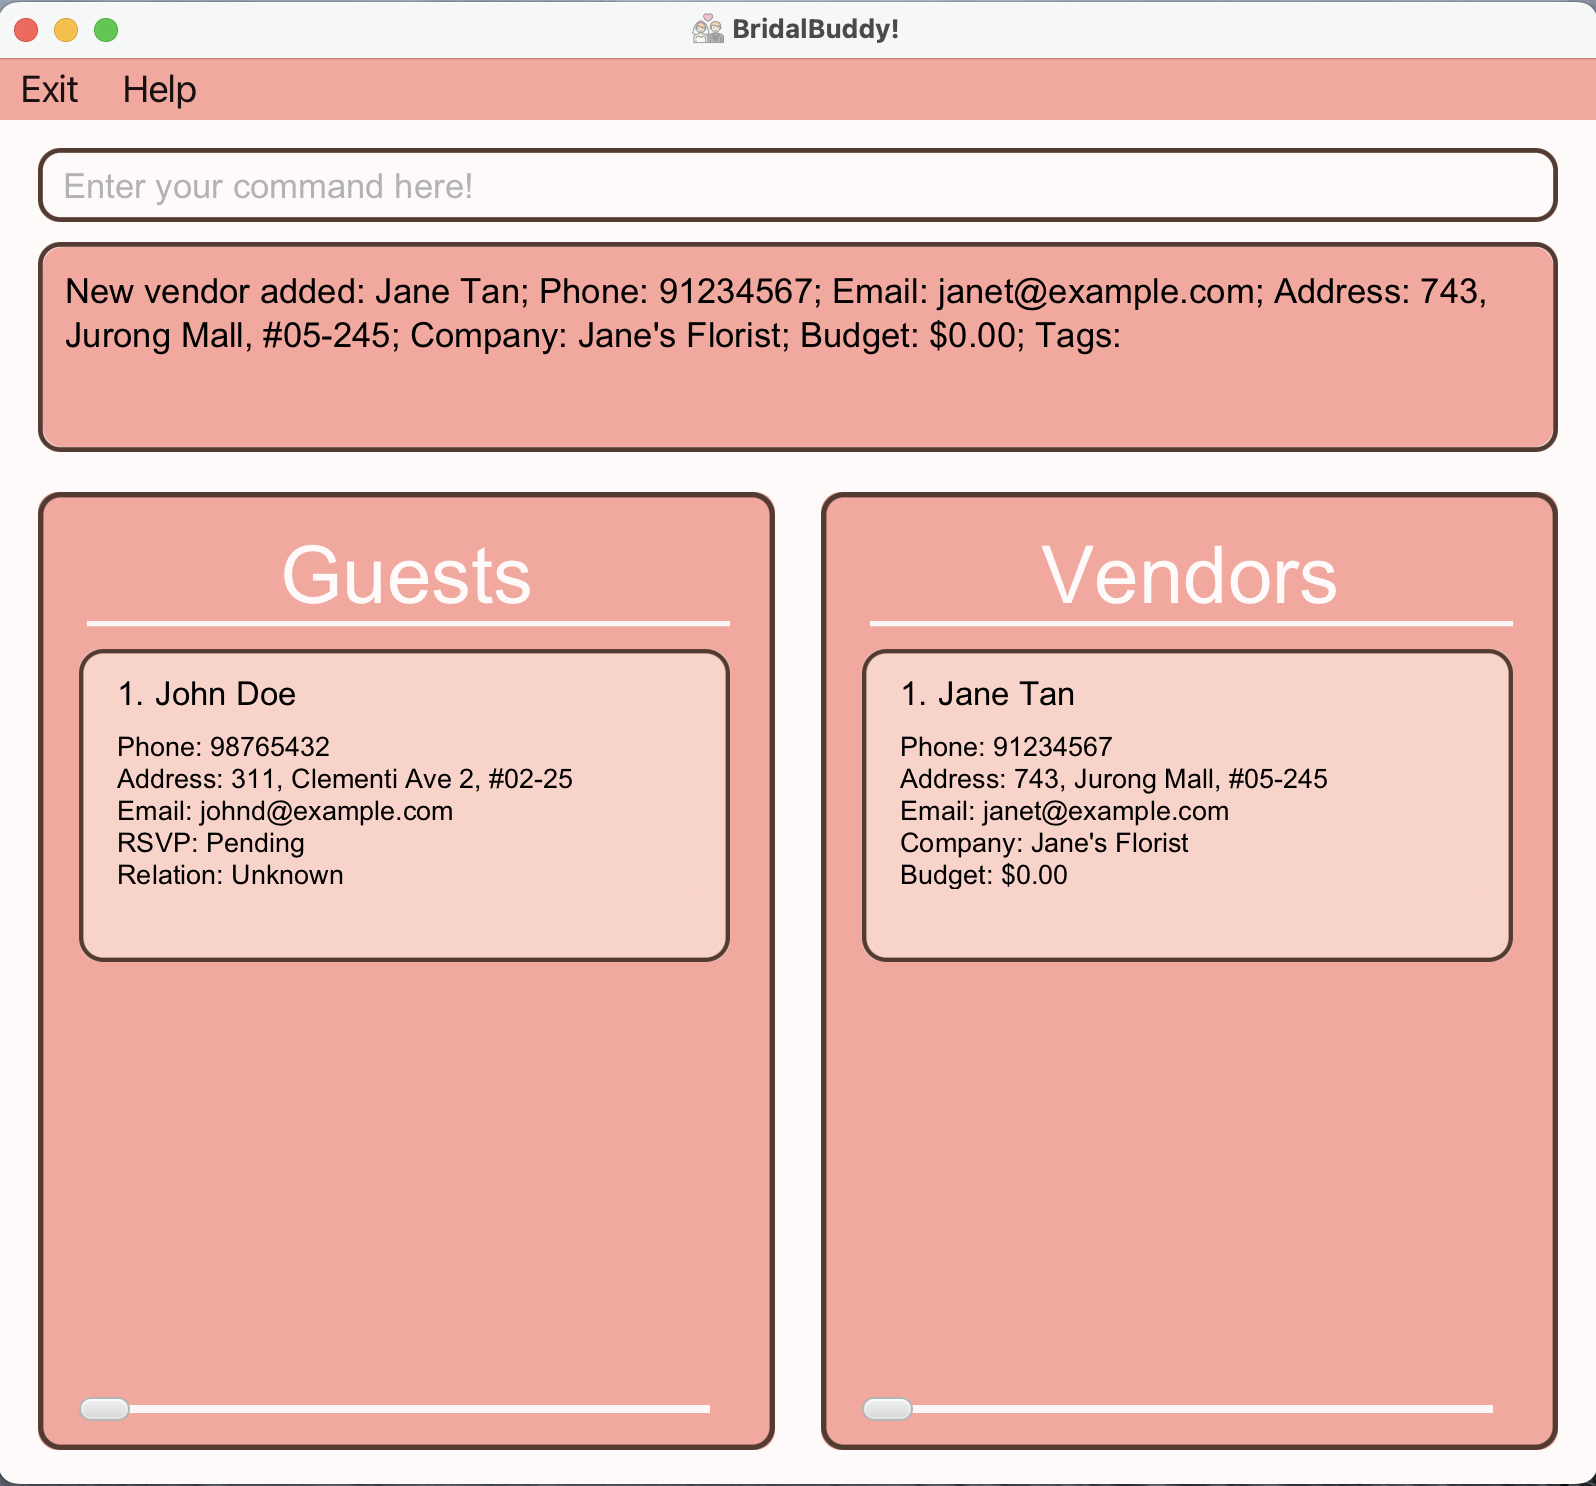
Let's try entering the following command in the Command Line: add_vendor n/Jane Tan p/91234567 e/janet@example.com a/743, Jurong Mall, #05-245 c/Jane's Florist.
This means you are adding a new vendor, with the name Jane Tan, phone number 91234567, email janet@example.com, address 743, Jurong Mall, #05-245 and company name Jane's Florist to the vendor list.
Once successful, you should see the following on your screen:
For more details on the add_vendor command, such as the additional optional fields you can classify a vendor with, we encourage you to refer to Adding a new vendor to the vendor list
Deleting persons
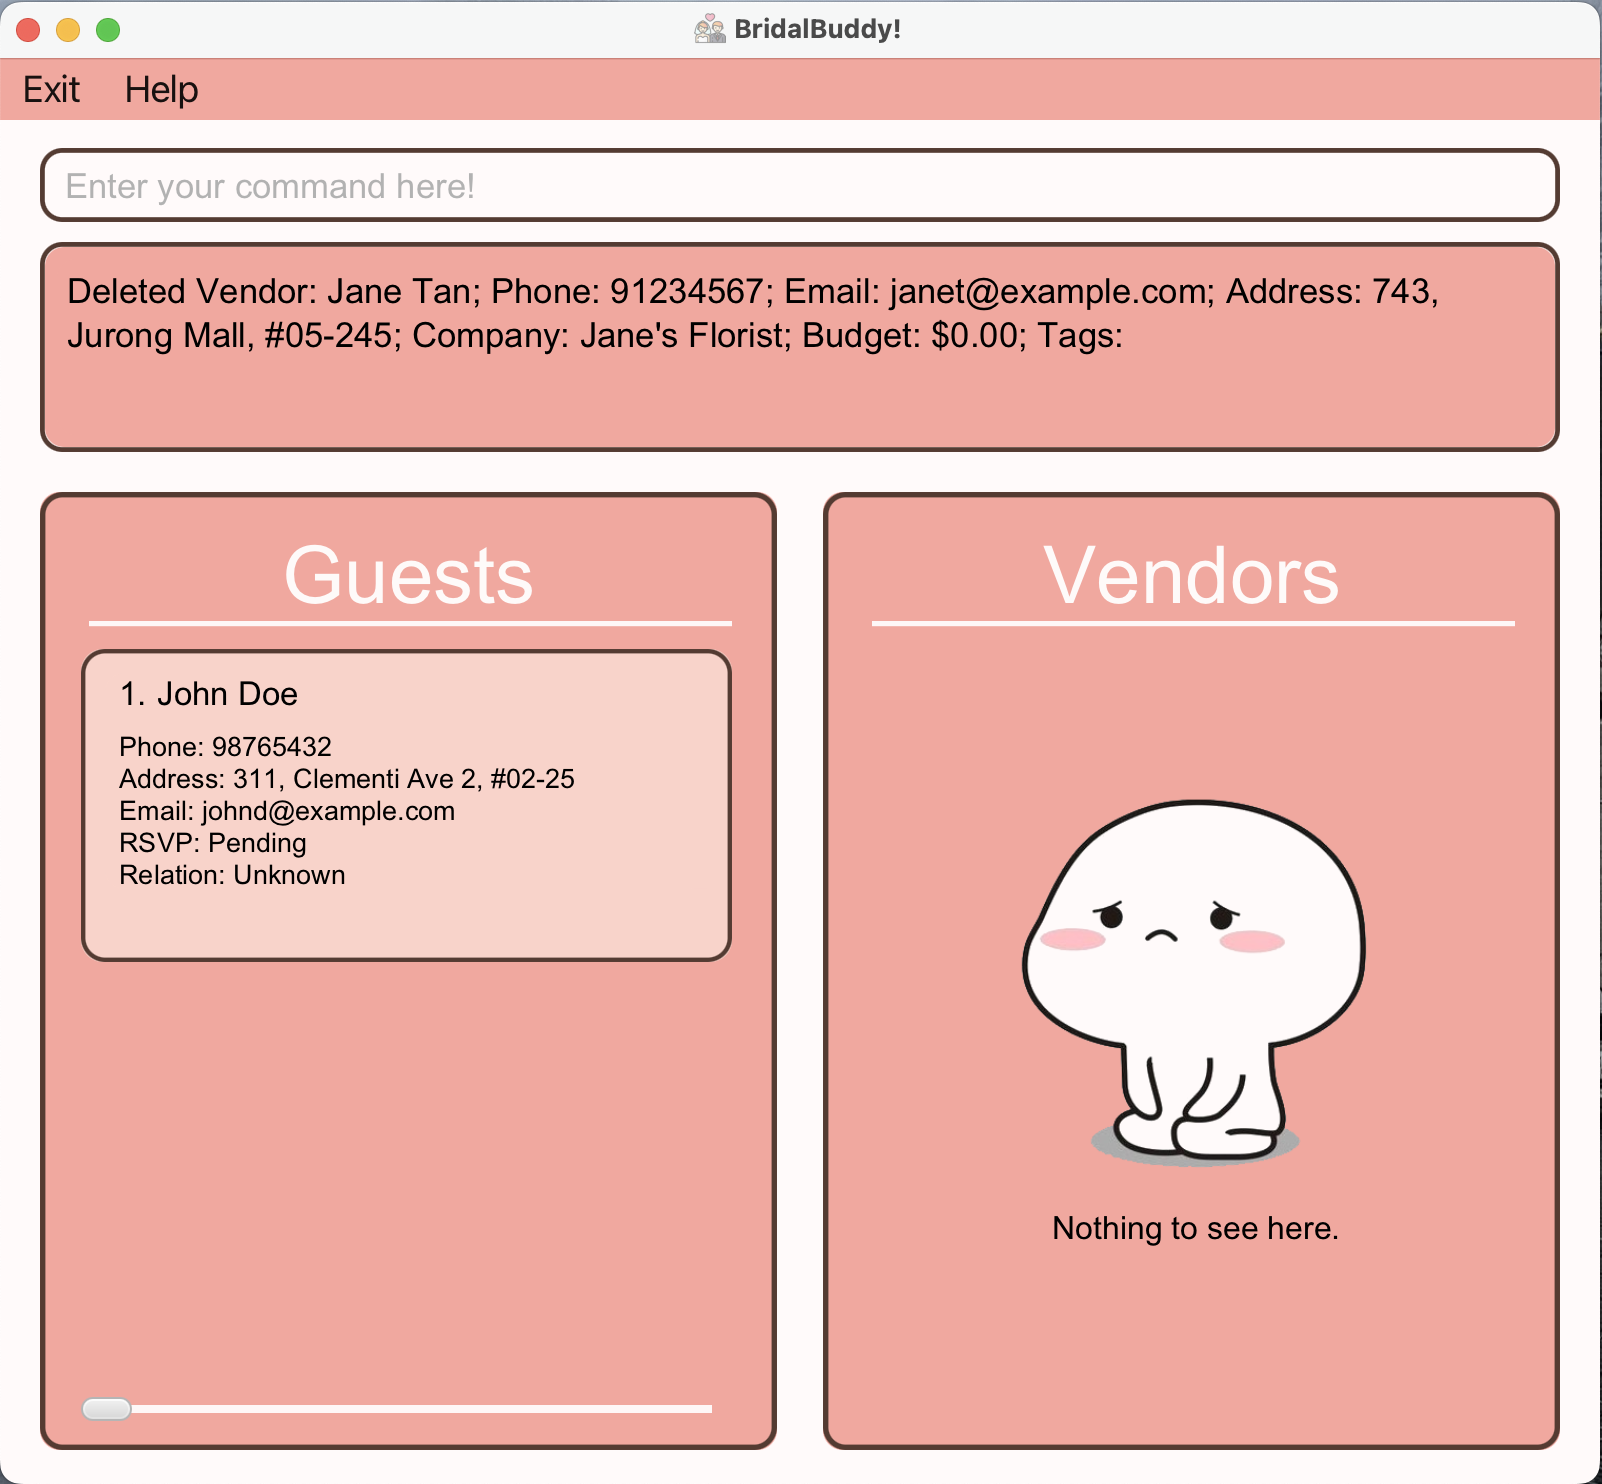
Suppose the bride tells us that she has a preferred florist in mind, and so you need to delete the florist you previously added to the vendor list.
Let's try entering the following command in the Command Line: delete_vendor 1.
This means you are deleting the first person that is currently being listed on your vendor list, which is Jane Tan.
Once successful, you should see the following on your screen:
Deleting a guest works in a similar way but using the delete_guest command instead.
For more details on the delete_guest and delete_vendor commands, we encourage you to refer to Deleting a guest from the guest list and Deleting a vendor from the vendor list respectively.
Exiting the program
It's been a long day at work. Now let's take a break and exit the application. All you have to do is simply enter the command exit in the Command Line, and the program will exit automatically in a few seconds!
- 💡 Not to worry, your progress will be auto-saved and all your work will be reflected correctly the next time you open the app.
After trying out the tutorial, we strongly recommend you to explore our features where you can discover the full range of tools and functionalities our app offers so that you can enhance your productivity and make the most out of BridalBuddy!
Features
💡 Notes about the command format:
Words in
UPPER_CASEare the parameters to be supplied by the user.
e.g. inadd n/NAME,NAMEis a parameter which can be used asadd n/John Doe.Items in square brackets are optional.
e.gn/NAME [t/TAG]can be used asn/John Doe t/friendor asn/John Doe.Items with
… after them can be used multiple times including zero times.
e.g.[t/TAG]…can be used as(i.e. 0 times),t/friend,t/friend t/familyetc.Parameters can be in any order.
e.g. if the command specifiesn/NAME p/PHONE_NUMBER,p/PHONE_NUMBER n/NAMEis also acceptable.For all commands that take in any prefix(es), the prefix(es) are case-sensitive (i.e. only small letters allowed, use of capital letters will result in an
Invalid prefix detectederror.)Extraneous parameters for commands that do not take in parameters (such as
help,list,exitandclear) will be ignored.
e.g. if the command specifieshelp 123, it will be interpreted ashelp.If you are using a PDF version of this document, be careful when copying and pasting commands that span multiple lines as space characters surrounding line-breaks may be omitted when copied over to the application.
General Commands
Commands listed in this section are applicable to both guest management and vendor management, or for using the app in general.
Viewing help : help
This command will open your web browser and redirect you to the online User Guide which will provide detailed instructions and resources for you to use the app.
- ⚠️ The online User Guide will require a stable internet connection to successfully open.
Format: help
Example Usage: help
Listing all persons : list
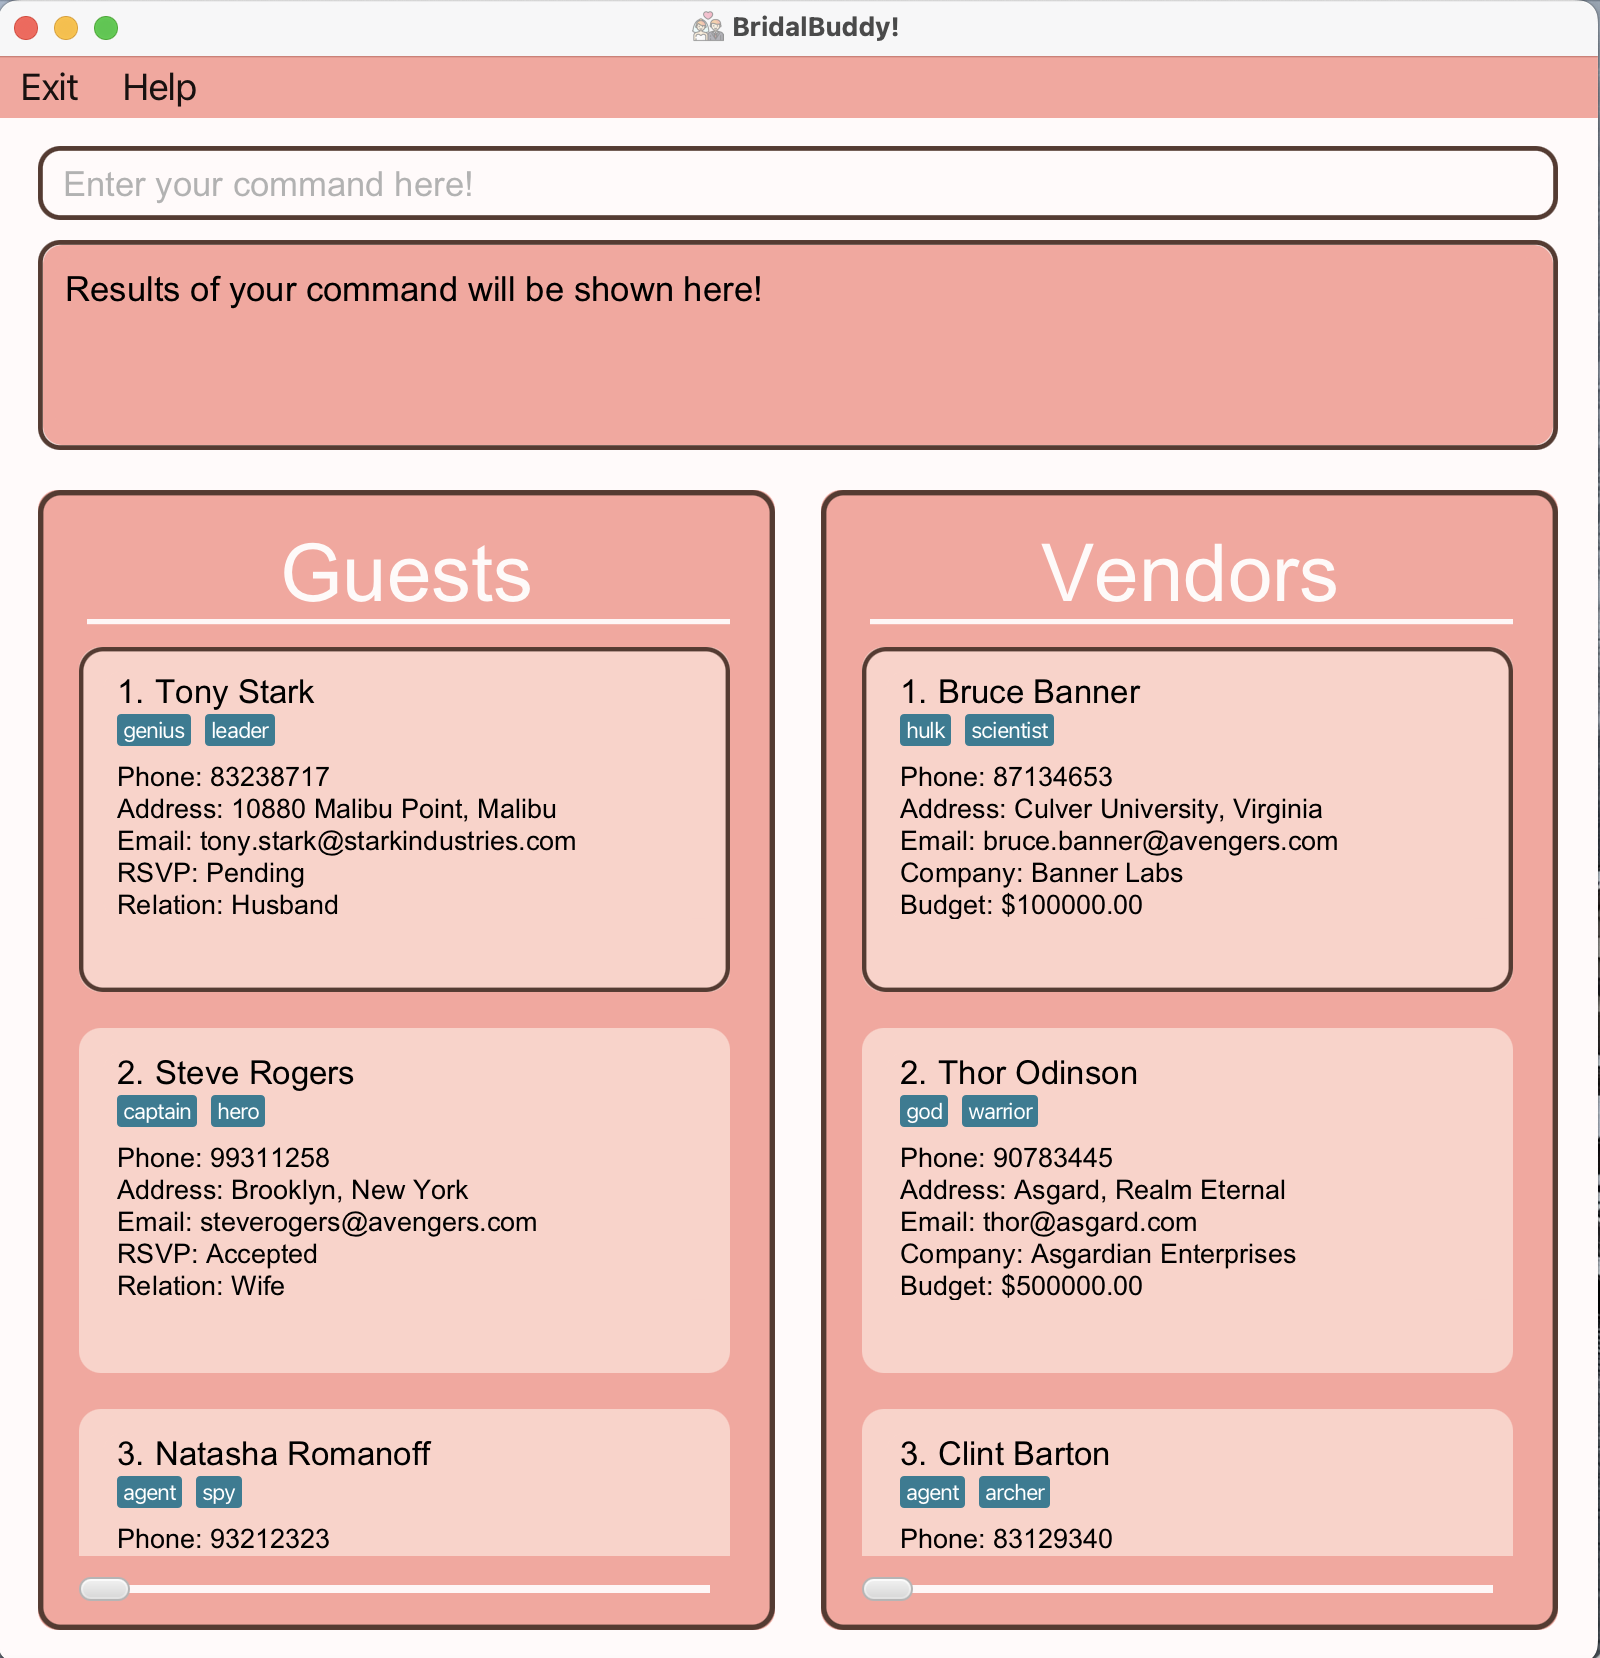
This command will show you a guest list consisting of all invited guests and a vendor list consisting of all vendors involved in the current wedding that you are planning.
- The guest list will be on the left of your screen while the vendor list will be on the right of your screen.
Format: list
Example Usage: list
Entering the list command returns the following result on your screen (using sample Guest data and Vendor data):

Finding a person : find
This command will help you find guests and vendors that match any of the given keyword(s) that you provide.
Format: find [n/NAME] [p/PHONE] [e/EMAIL] [a/ADDRESS] [rsvp/RSVP] [r/relation] [c/COMPANY] [b/BUDGET] [t/TAG]...
⚠️ Exactly one type of prefix should be used for each
findcommand.
- Specifying multiple different prefixes (e.g.
find n/John p/12345) will result in an invalid command - The prefix specified in the command indicates the attribute to be searched (e.g.
find n/NAMEsearches for guests and vendors whose name matches the given keyword) - The search is case-insensitive for all fields (e.g.
jOhNwill matchJohn) - The order of the keywords does not matter. e.g.
John Doewill matchDoe John - Only full words will be matched e.g.
Jowill not matchJohn - Guest/Vendor matching any of the keywords will be returned (e.g.
John Tanwill returnJohn DoeandAlan Tan)
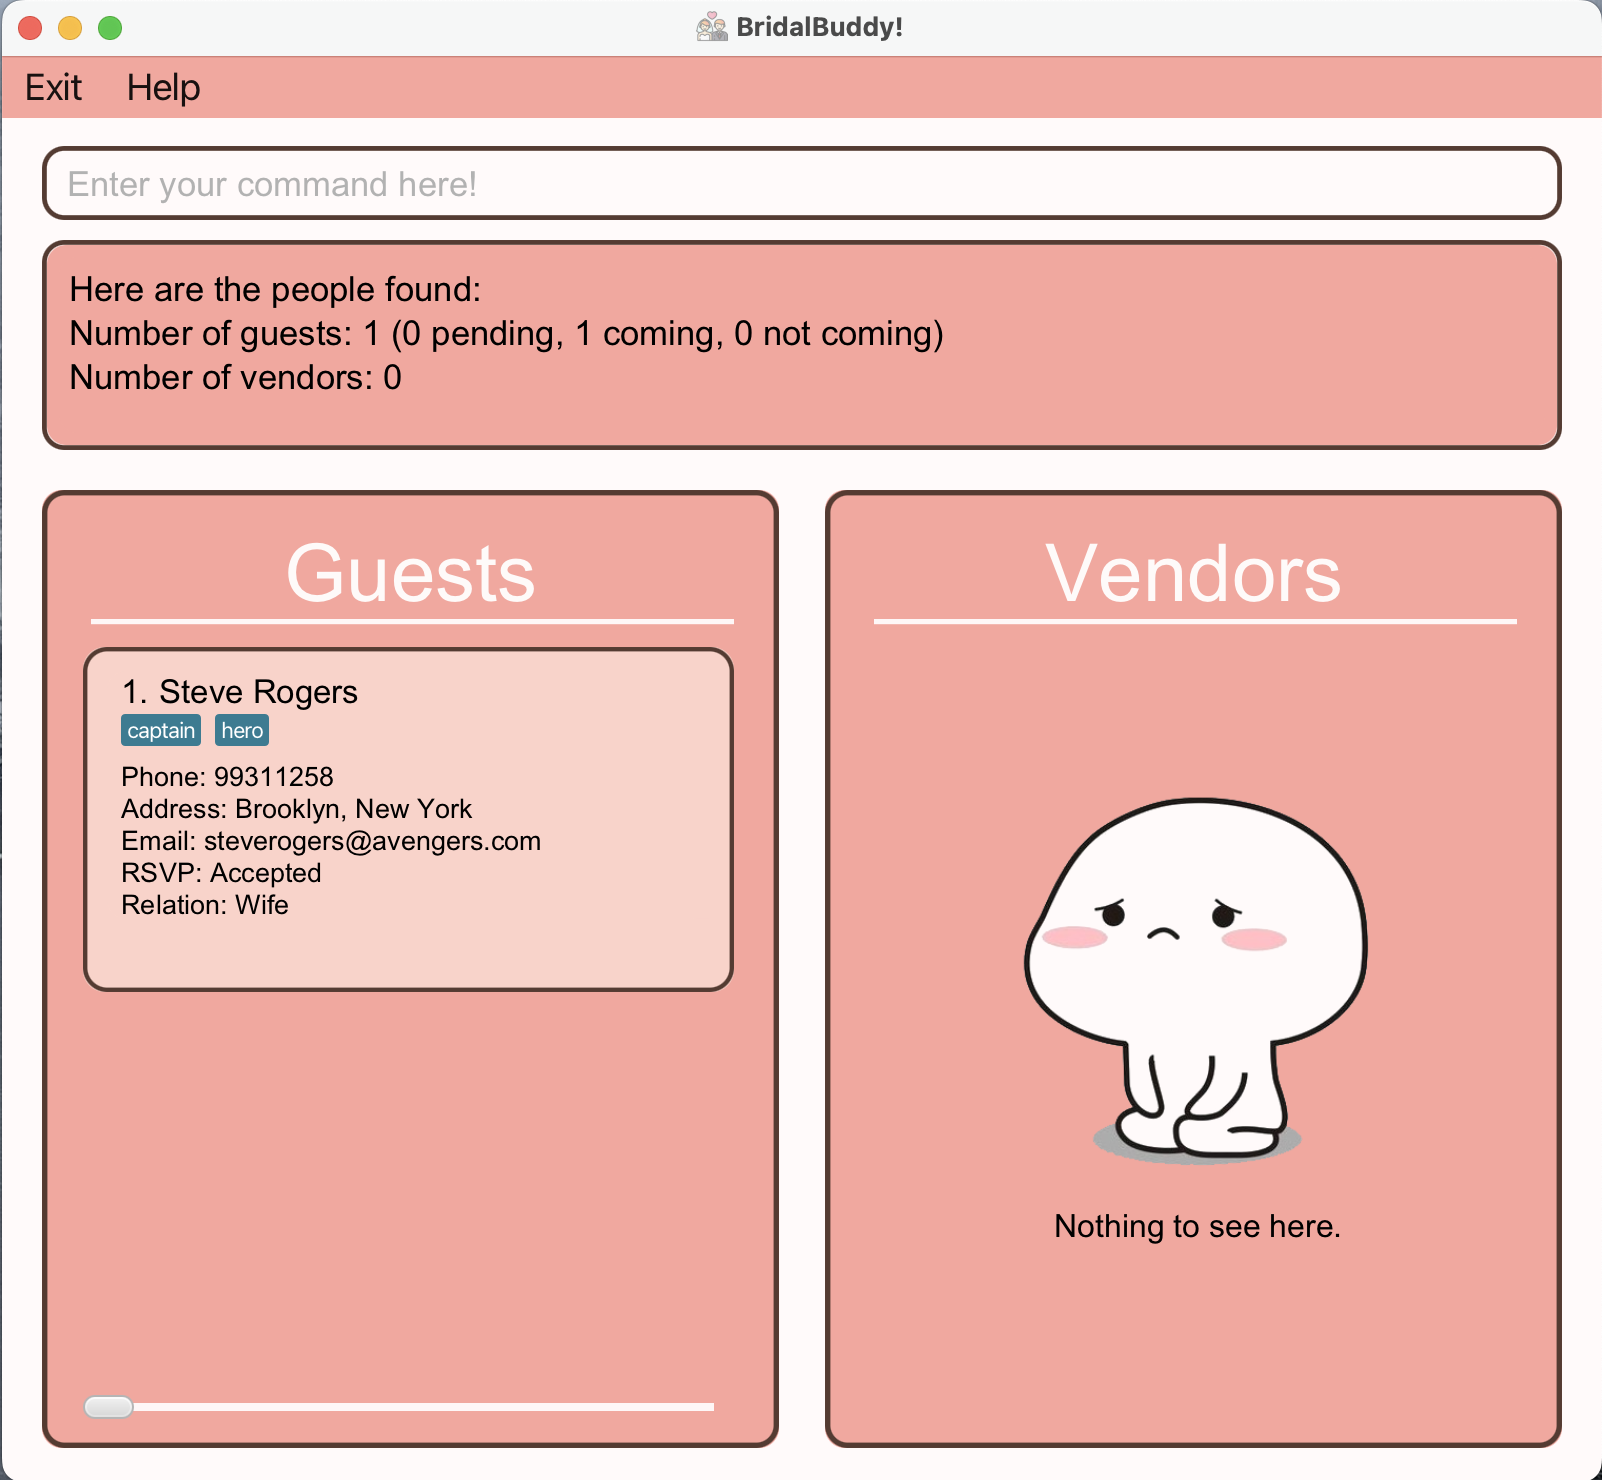
Example Usage: find n/Steve
Entering the find n/Steve command returns the following result on your screen (using sample Guest data and Vendor data):
Clearing all entries : clear
This command will help you clear and empty out the entire guest list and vendor list, and could be good to help you start off your preparations for the next wedding.
Format: clear
Example Usage: clear
Entering the clear command returns the following result on your screen:
Viewing statistics : stats
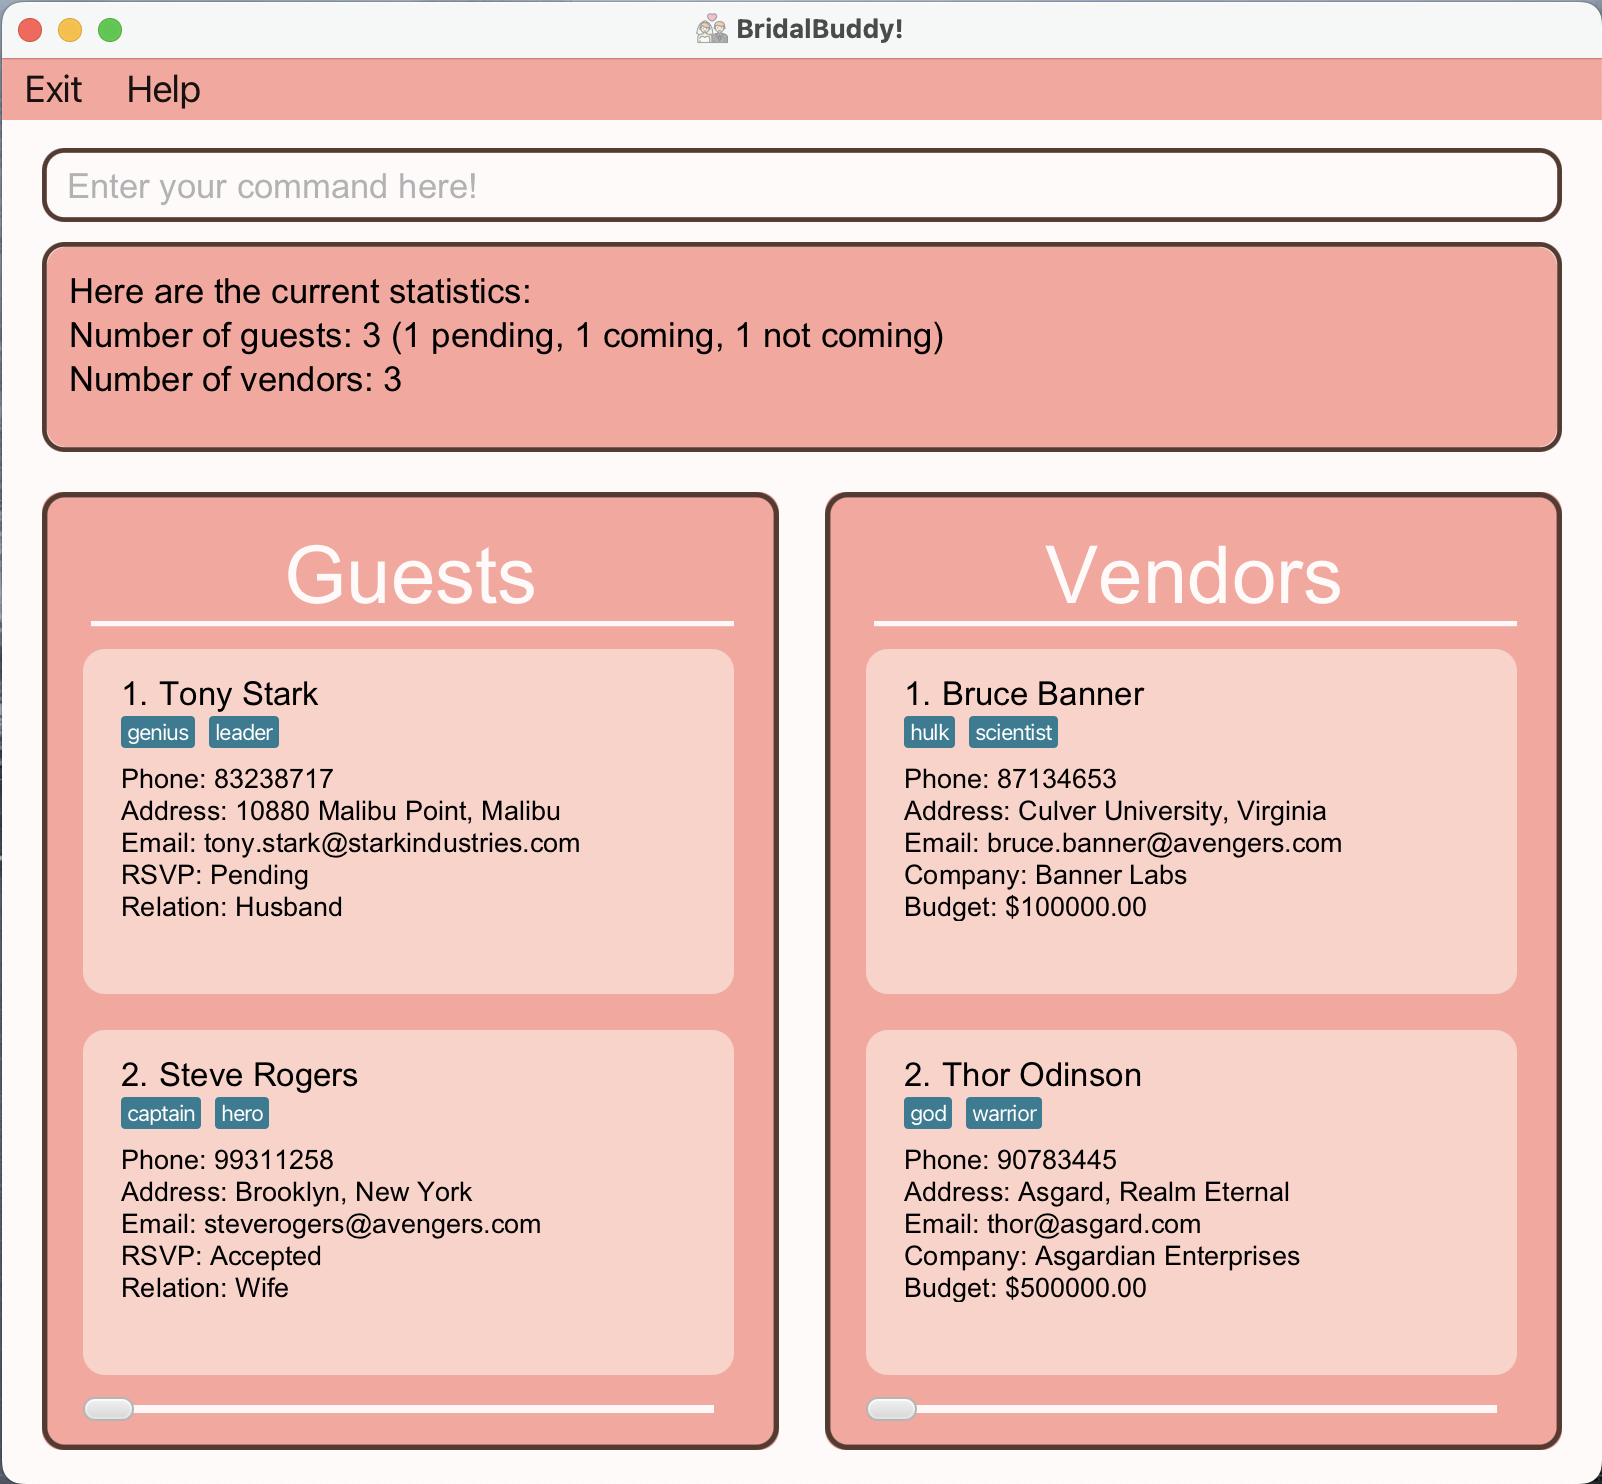
This command will display to you the total number of guests invited to the wedding and the total number of vendors involved in the wedding.
Format: stats
Example Usage: stats
Entering the stats command returns the following result on your screen (using sample Guest data and Vendor data):
Exiting the program : exit
This command will exit the program.
Format: exit
Example Usage: exit
Guest Related Commands
Commands listed in this section are applicable to managing your guest list (guest management).
Adding a guest : add_guest
This command will help you add a new guest to the bottom of the existing overall guest list.
Format: add_guest n/NAME p/PHONE e/EMAIL a/ADDRESS [rsvp/RSVP] [r/RELATION] [t/TAG]...
⚠️ You can only enter 'P'/'p' for pending, 'A'/'a' for accepted or 'D'/'d' for declined for the optional
RSVPfield.
⚠️ You can only enter 'H'/'h' for related to husband, 'W'/'w' for related to wife or 'U'/'u' for unknown for the optional
RELATIONfield.
⚠️ If you attempt to add a new guest with both the same
NAMEandPHONEas another existing guest in the guest list, an error will be shown.
ℹ️ As of now, BridalBuddy only supports one single word per
TAG.ℹ️ As of now, BridalBuddy only supports alphanumeric characters and spaces for
NAME, and it should not be blank.
Example Usage: add_guest n/Alan Tan p/97462948 e/alantan@example.com a/123, Jurong Ave 12, #012-845 rsvp/d r/w
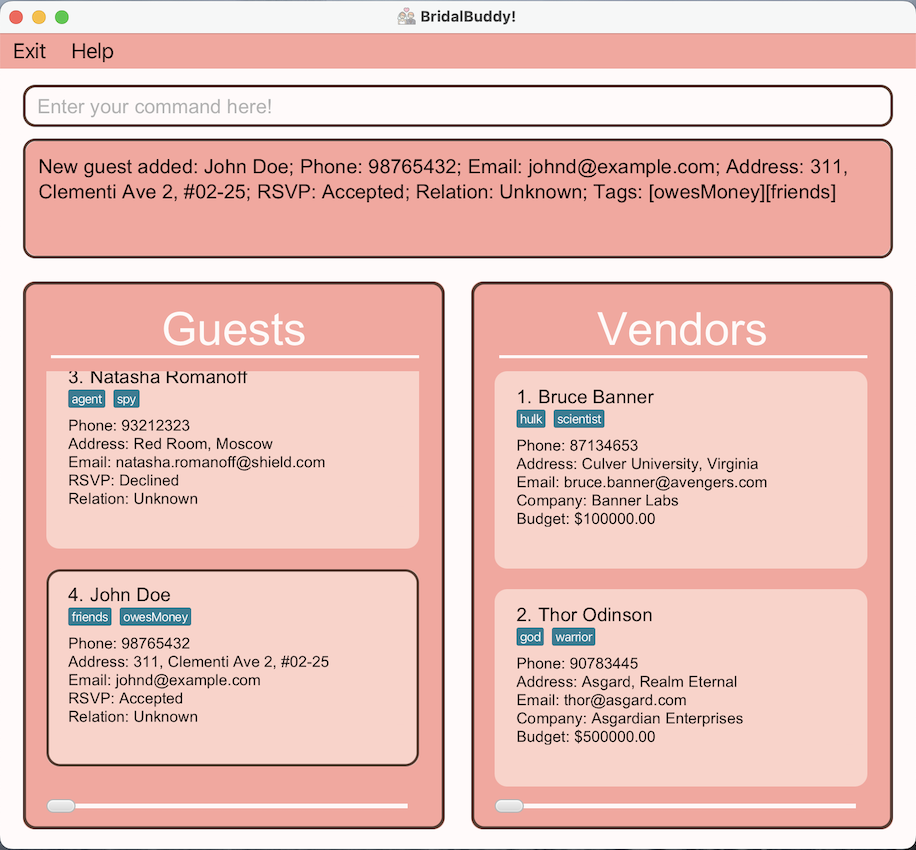
Example Usage: add_guest n/John Doe p/98765432 e/johnd@example.com a/311, Clementi Ave 2, #02-25 rsvp/A r/U t/friends t/owesMoney
Entering the add_guest n/John Doe p/98765432 e/johnd@example.com a/311, Clementi Ave 2, #02-25 rsvp/A r/U t/friends t/owesMoney command returns the following result on your screen:
Editing a guest : edit_guest
This command will allow you to edit the details of the guest identified by the INDEX number used in the displayed guest list. Existing values will be overwritten by the input values.
Format: edit_guest INDEX [n/NAME] [p/PHONE] [e/EMAIL] [a/ADDRESS] [rsvp/RSVP] [r/RELATION] [t/TAG]...
⚠️ If the
INDEXyou enter is not a positive integer, the command will automatically be deemed as invalid.
⚠️ If you attempt to edit the details of an existing guest such that they end up with both the same
NAMEandPHONEas another existing guest in the guest list, an error will be shown.
⚠️ At least 1 field of a
Guesthas to be specified for the command to be valid.
ℹ️ As of now, BridalBuddy only supports one single word per
TAG.ℹ️ As of now, BridalBuddy only supports alphanumeric characters and spaces for
NAME, and it should not be blank.💡 The
INDEXyou enter should be theINDEXof the guest you want to edit on the exact guest list currently displayed on your screen.- Even if a
guestJohn Doehas anINDEXof 4 on the overall guest list, enteringfind n/Johnfollowed byedit_guest 1 p/91234567 e/johndoe@example.comwould still edit the details ofJohn Doe, assuming that there is only 1 guest withJohnin their name.
- Even if a
Example Usage: edit_guest 2 p/98274626 e/helloworld@example.com
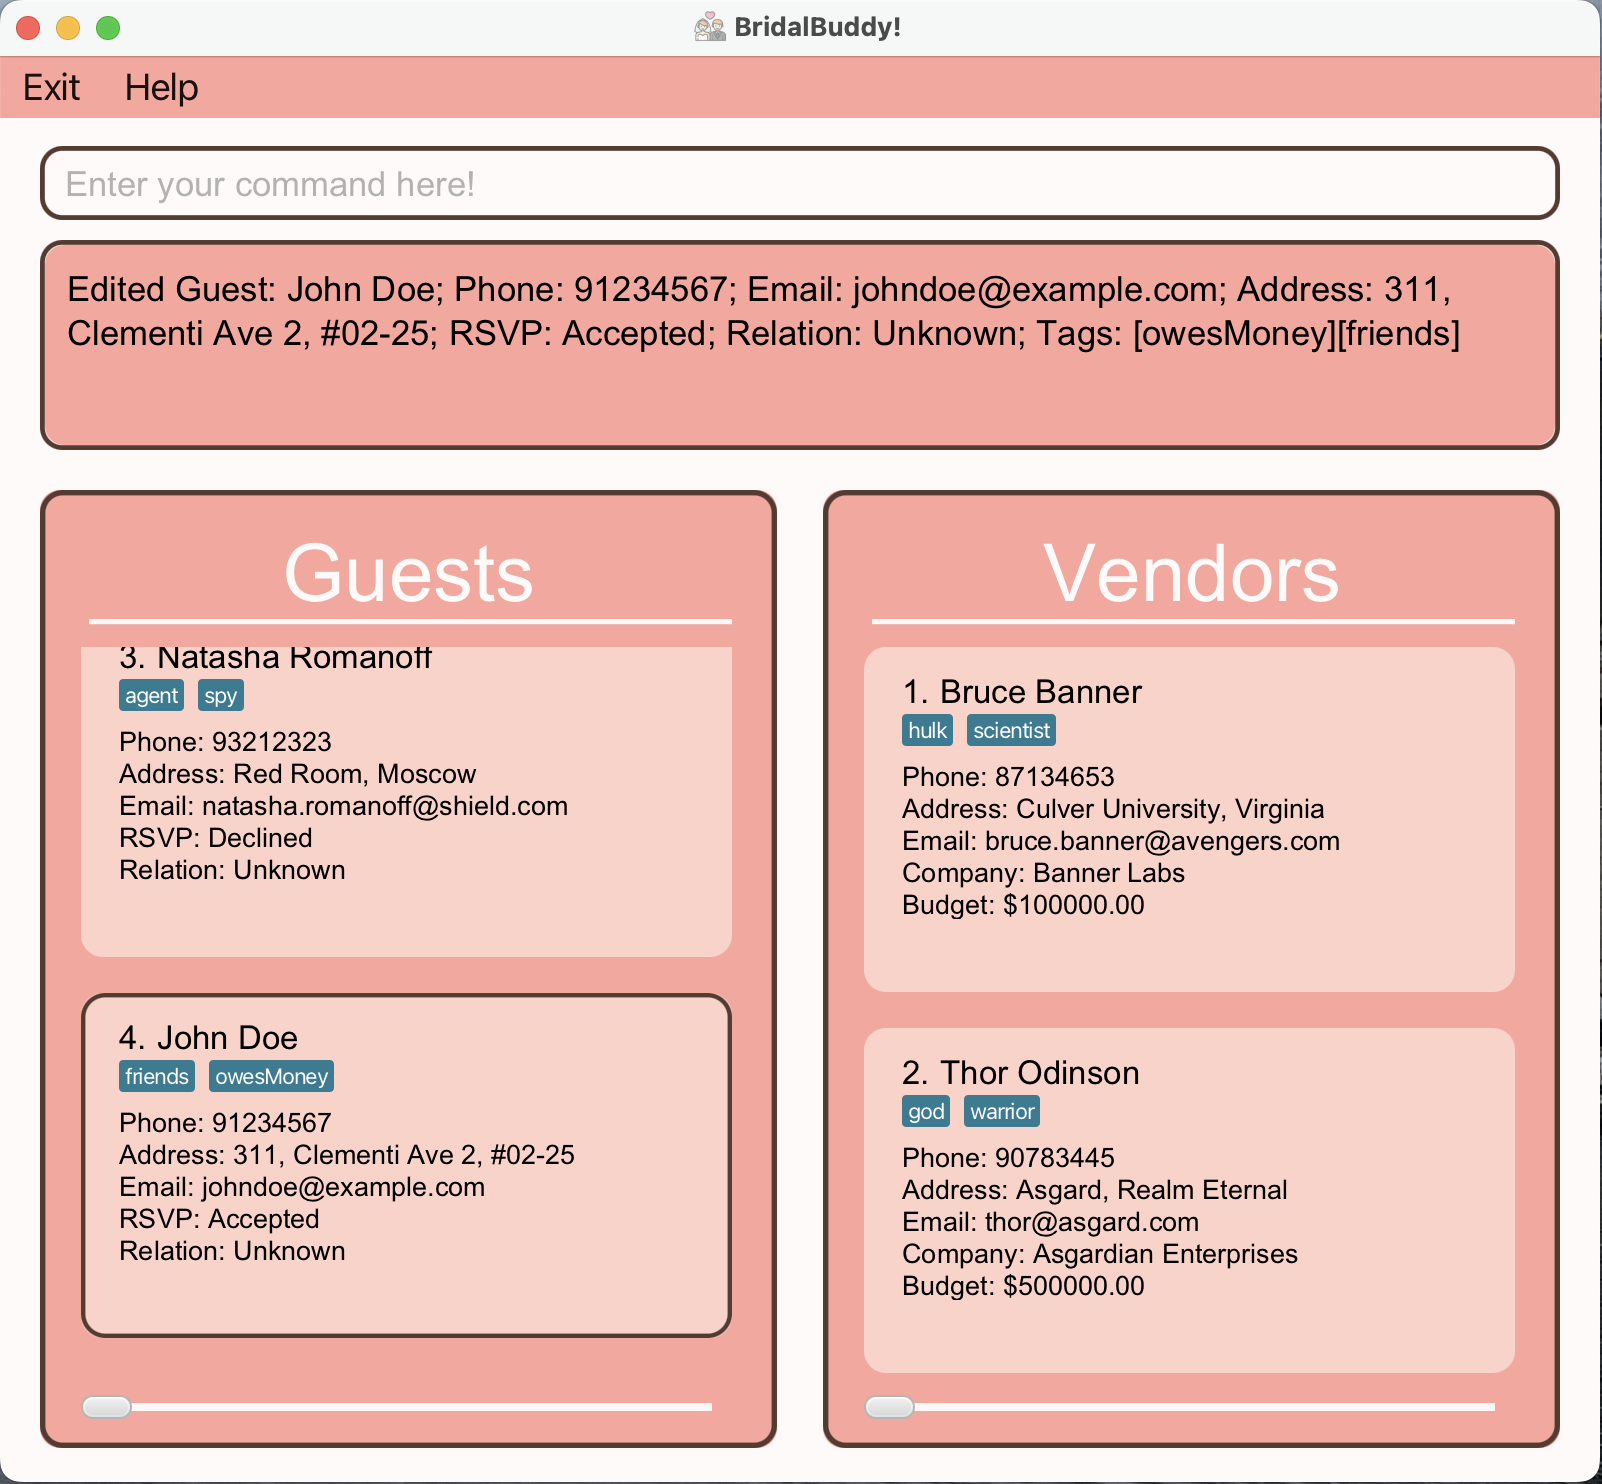
Example Usage: edit_guest 4 p/91234567 e/johndoe@example.com
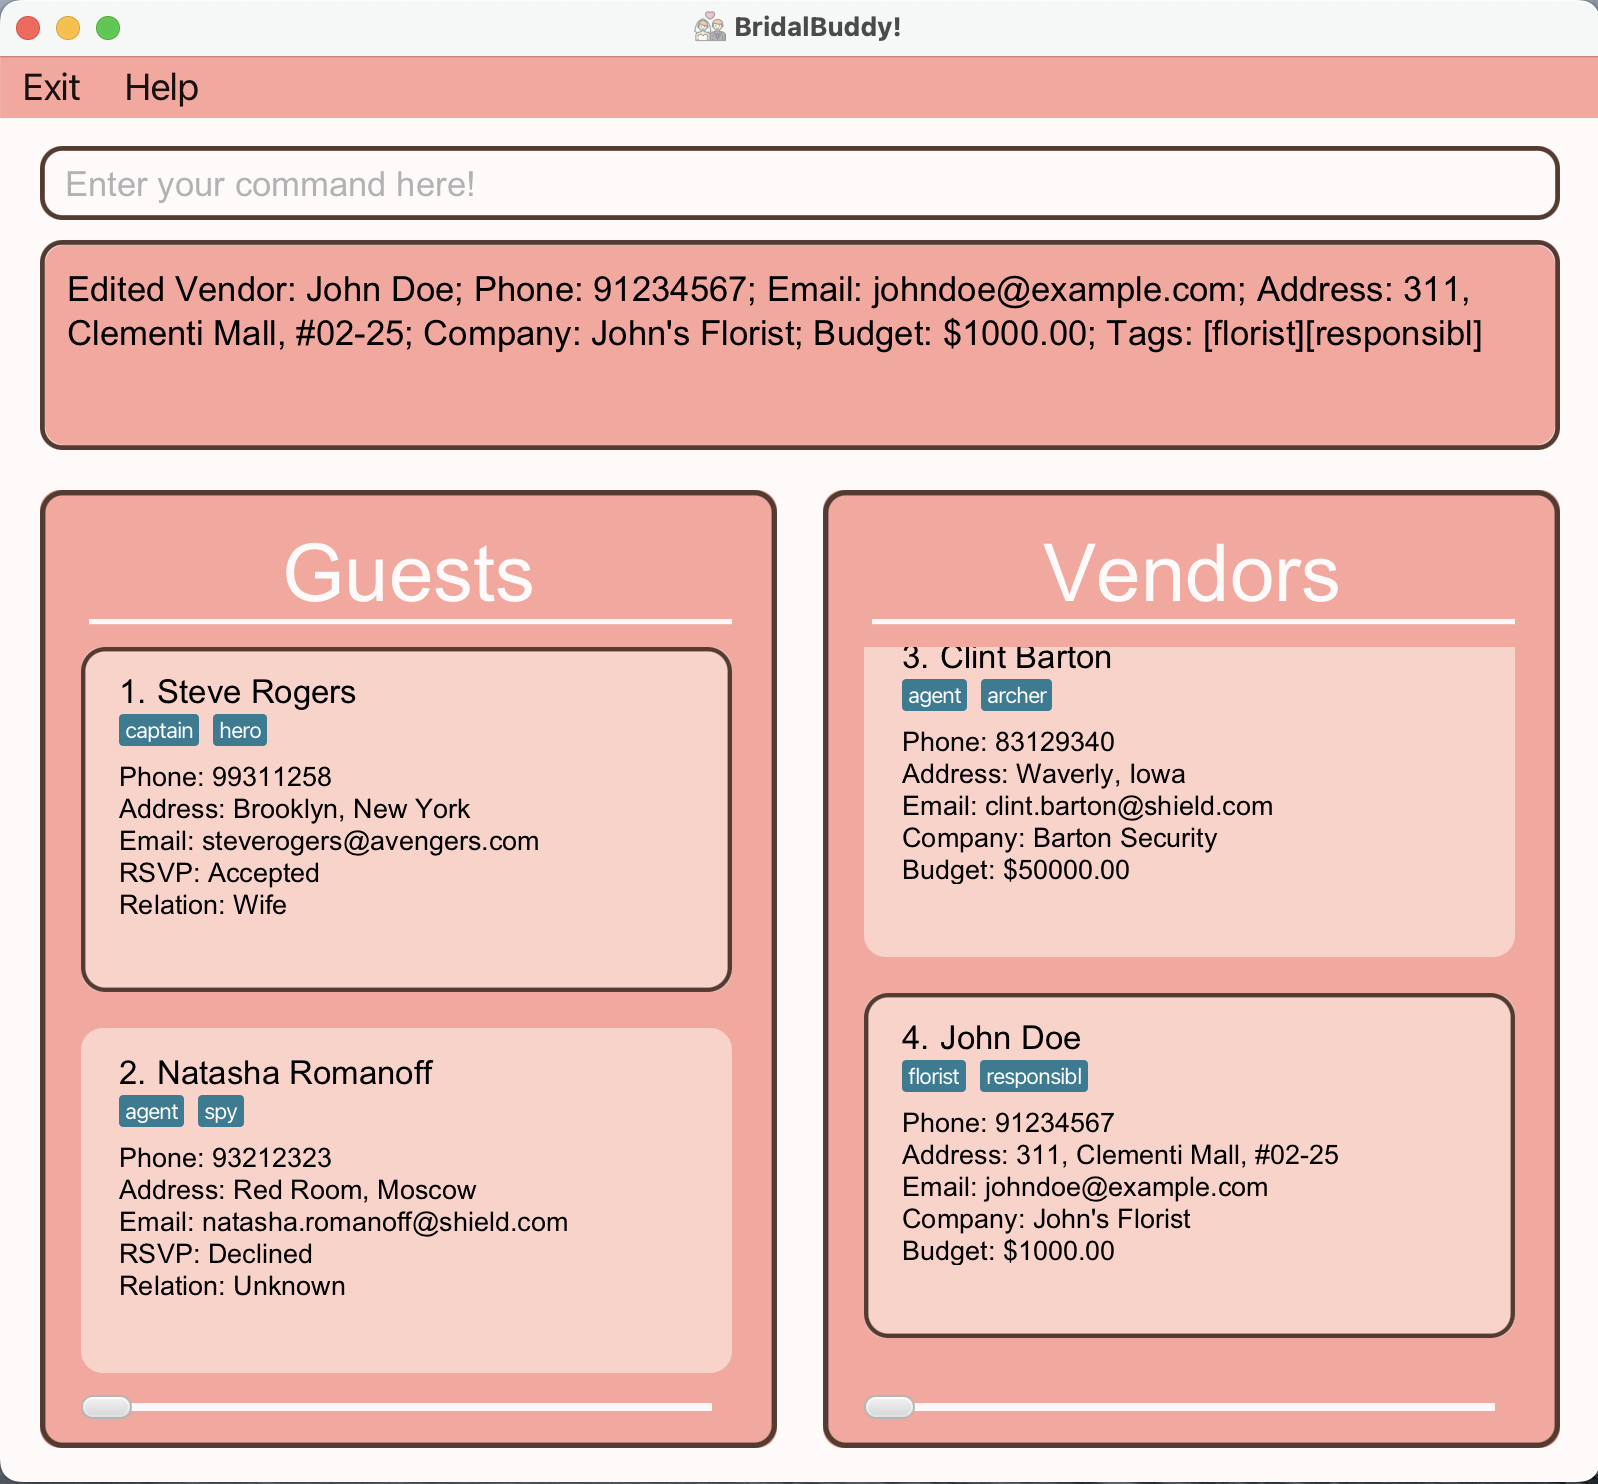
Entering the edit_guest 4 p/91234567 e/johndoe@example.com command returns the following result on your screen:
Deleting a guest : delete_guest
This command will help you delete a guest from your existing guest list, identified by the INDEX number used in the displayed guest list.
Format: delete_guest INDEX
⚠️ If the
INDEXyou enter is not a positive integer, the command will automatically be deemed as invalid.
💡 The
INDEXyou enter should be theINDEXof the guest you want to delete on the exact guest list currently displayed on your screen.- Even if a
guestJohn Doehas anINDEXof 4 on the overall guest list, enteringfind n/Johnfollowed bydelete_guest 1would still delete the details ofJohn Doe, assuming that there is only 1 guest withJohnin their name.
- Even if a
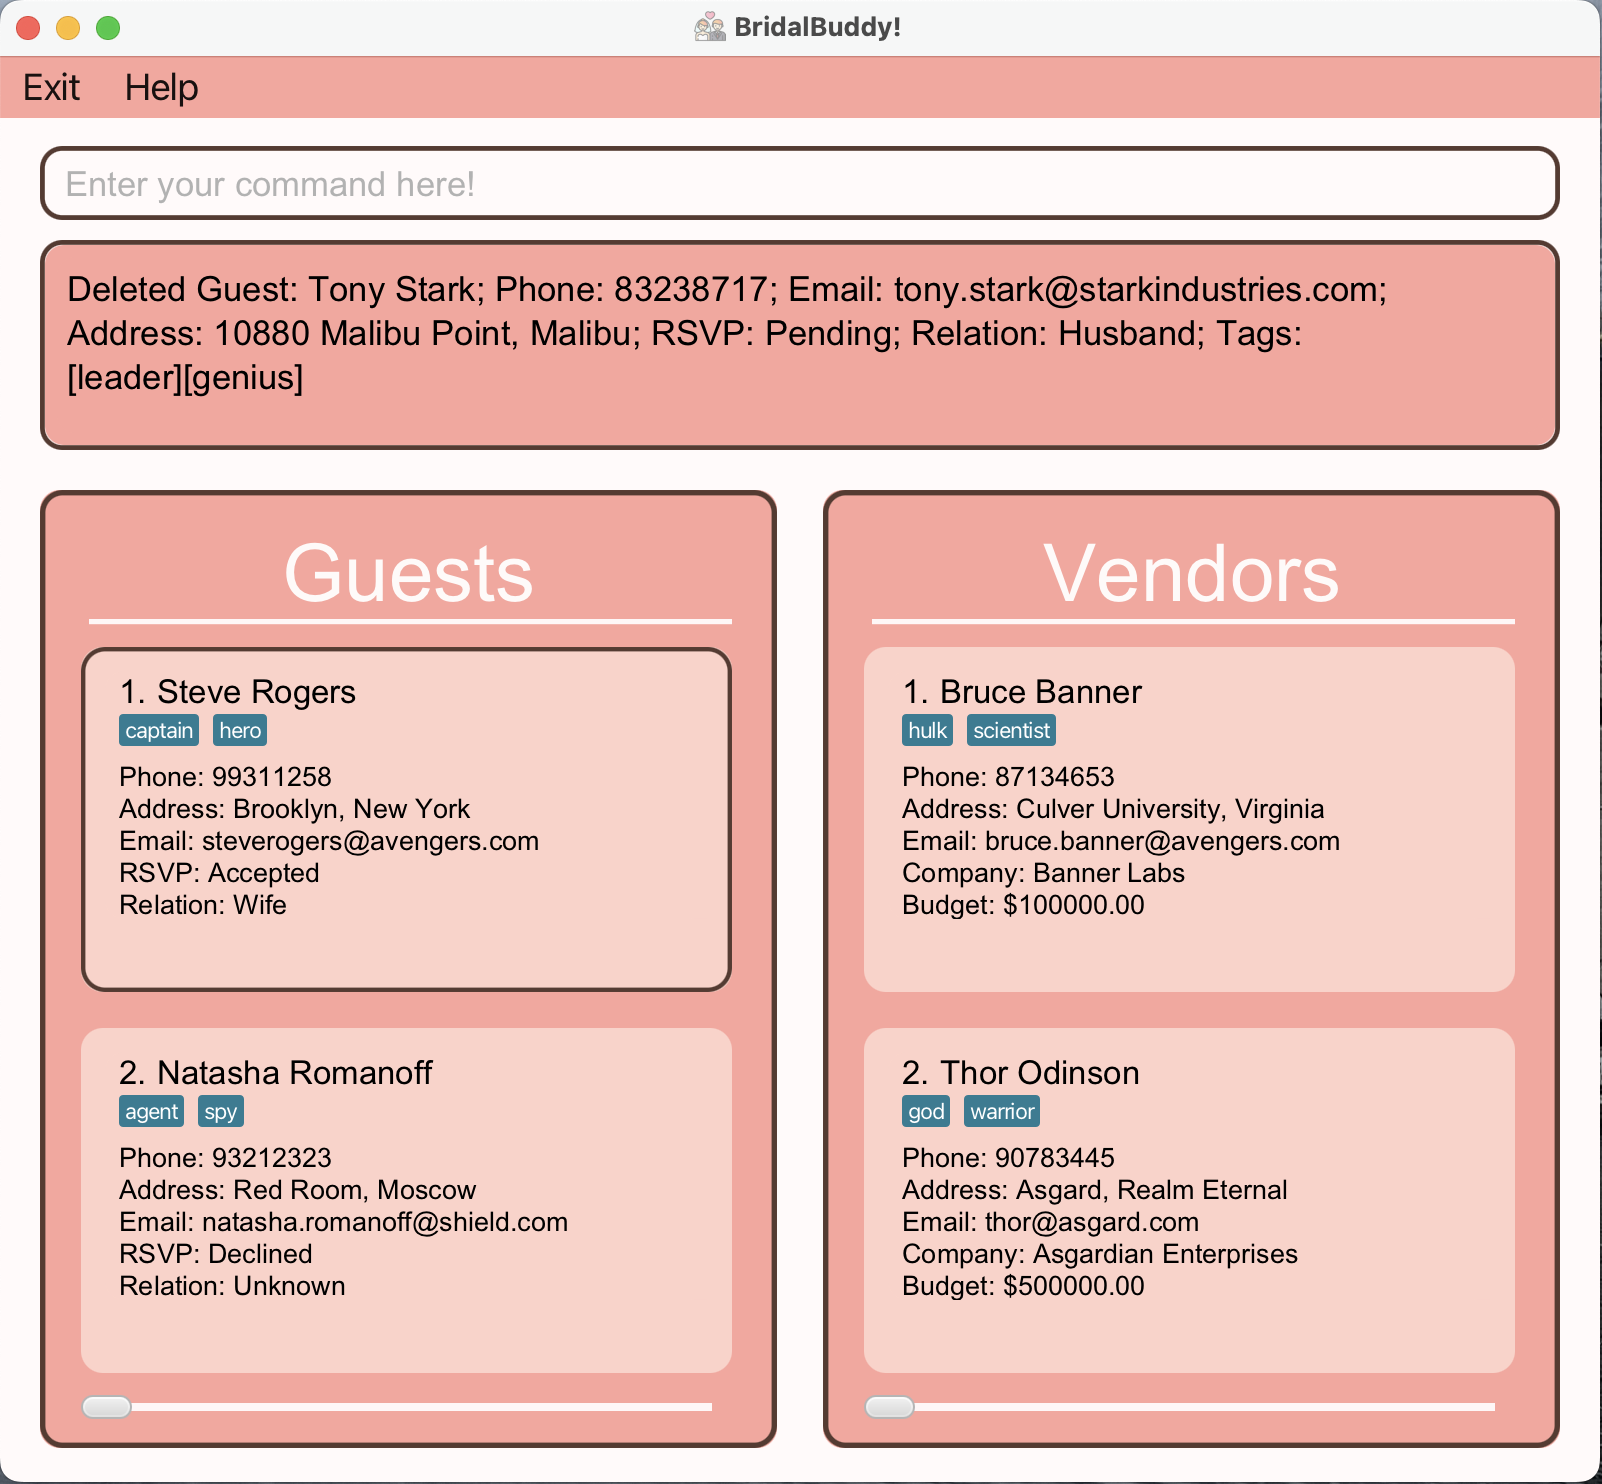
Example Usage: delete_guest 1
Assuming that Guest Tony Stark has an INDEX of 1 on the existing guest list, entering the delete_guest 1 command returns the following result on your screen:
Vendor Related Commands
Commands listed in this section are applicable to managing your vendor list (vendor management).
Adding a vendor : add_vendor
This command will help you add a new vendor to the bottom of the existing overall vendor list.
Format: add_vendor n/NAME p/PHONE e/EMAIL a/ADDRESS c/COMPANY [b/BUDGET] [t/TAG]...
⚠️ You can only enter a non-negative number with up to 2 decimal places for the optional
BUDGETfield.
⚠️ If you attempt to add a new vendor with both the same
NAMEandPHONEas another existing vendor in the vendor list, an error will be shown.
ℹ️ As of now, BridalBuddy only supports one single word per
TAG.ℹ️ As of now, BridalBuddy only supports alphanumeric characters and spaces for
NAME, and it should not be blank.
Example Usage: add_vendor n/Alan Tan p/94838274 e/alantan@example.com a/842, Jurong Mall, #02-297 c/Alan's Jewellery b/100000.99
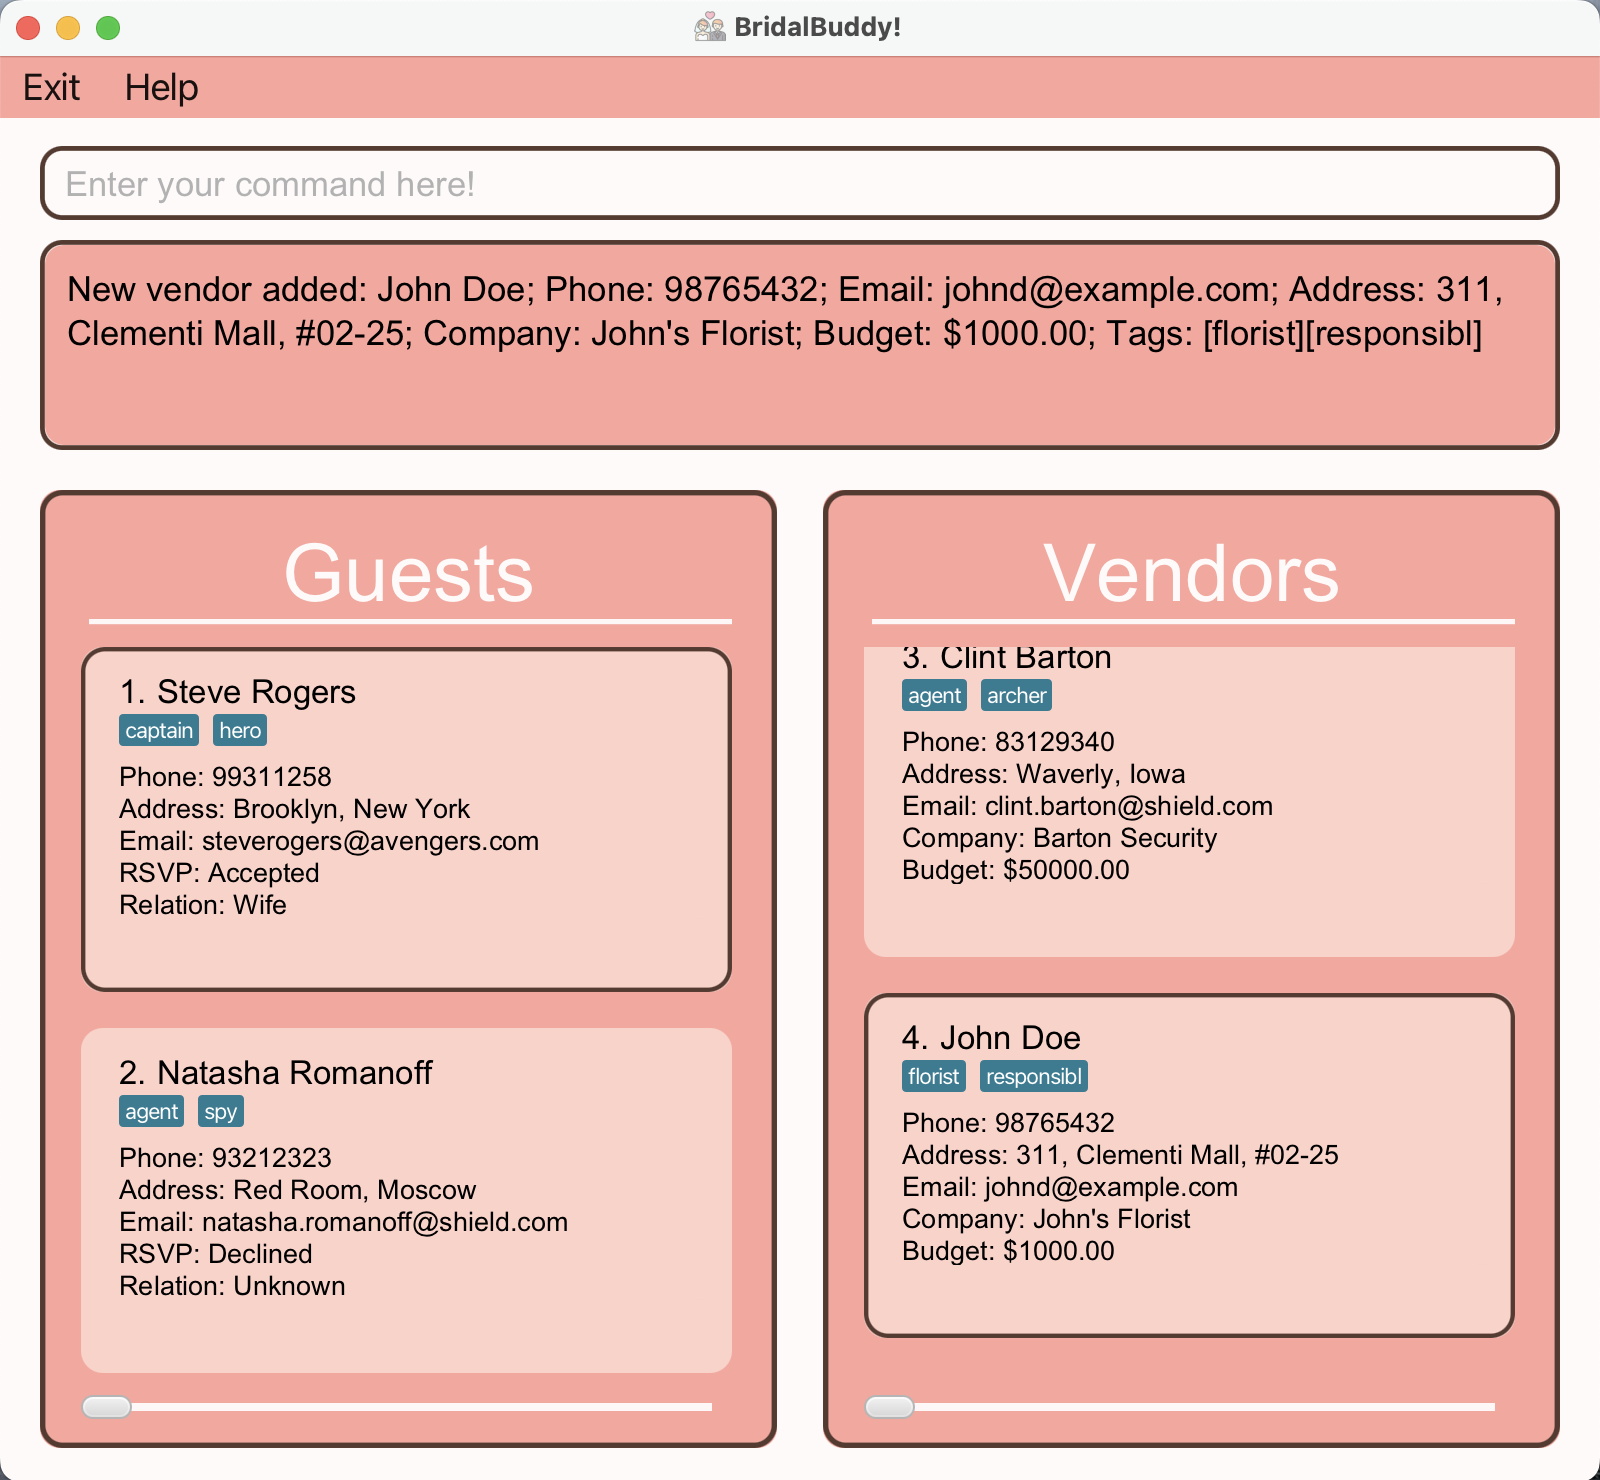
Example Usage: add_vendor n/John Doe p/98765432 e/johnd@example.com a/311, Clementi Mall, #02-25 c/John's Florist b/1000 t/florist t/responsible
Entering the add_vendor n/John Doe p/98765432 e/johnd@example.com a/311, Clementi Mall, #02-25 c/John's Florist b/1000 t/florist t/responsible command returns the following result on your screen:
Editing a vendor : edit_vendor
This command will allow you to edit the details of the vendor identified by the INDEX number used in the displayed vendor list. Existing values will be overwritten by the input values.
Format: edit_vendor INDEX [n/NAME] [p/PHONE] [e/EMAIL] [a/ADDRESS] [c/COMPANY] [b/BUDGET] [t/TAG]...
⚠️ If the
INDEXyou enter is not a positive integer, the command will automatically be deemed as invalid.
⚠️ If you attempt to edit the details of an existing vendor such that they end up with both the same
NAMEandPHONEas another existing vendor in the vendor list, an error will be shown.
⚠️ At least 1 field of a
Vendorhas to be specified for the command to be valid.
ℹ️ As of now, BridalBuddy only supports one single word per
TAG.ℹ️ As of now, BridalBuddy only supports alphanumeric characters and spaces for
NAME, and it should not be blank.💡 The
INDEXyou enter should be theINDEXof the vendor you want to edit on the exact vendor list currently displayed on your screen.- Even if a
vendorJohn Doehas anINDEXof 4 on the overall vendor list, enteringfind n/Johnfollowed byedit_vendor 1 p/91234567 e/johndoe@example.comwould still edit the details ofJohn Doe, assuming that there is only 1 vendor withJohnin their name.
- Even if a
Example Usage: edit_vendor 2 p/82737573 e/hiworld@example.com
Example Usage: edit_vendor 4 p/91234567 e/johndoe@example.com
Entering the edit_vendor 4 p/91234567 e/johndoe@example.com command returns the following result on your screen:
Deleting a vendor : delete_vendor
This command will help you delete a vendor from your existing vendor list, identified by the INDEX number used in the displayed vendor list.
Format: delete_vendor INDEX
⚠️ If the
INDEXyou enter is not a positive integer, the command will automatically be deemed as invalid.
💡 The
INDEXyou enter should be theINDEXof the vendor you want to delete on the exact vendor list currently displayed on your screen.- Even if a
vendorJohn Doehas anINDEXof 3 on the overall vendor list, enteringfind n/Johnfollowed bydelete_vendor 1would still delete the details ofJohn Doe, assuming that there is only 1 vendor withJohnin their name.
- Even if a
Example Usage: delete_vendor 1
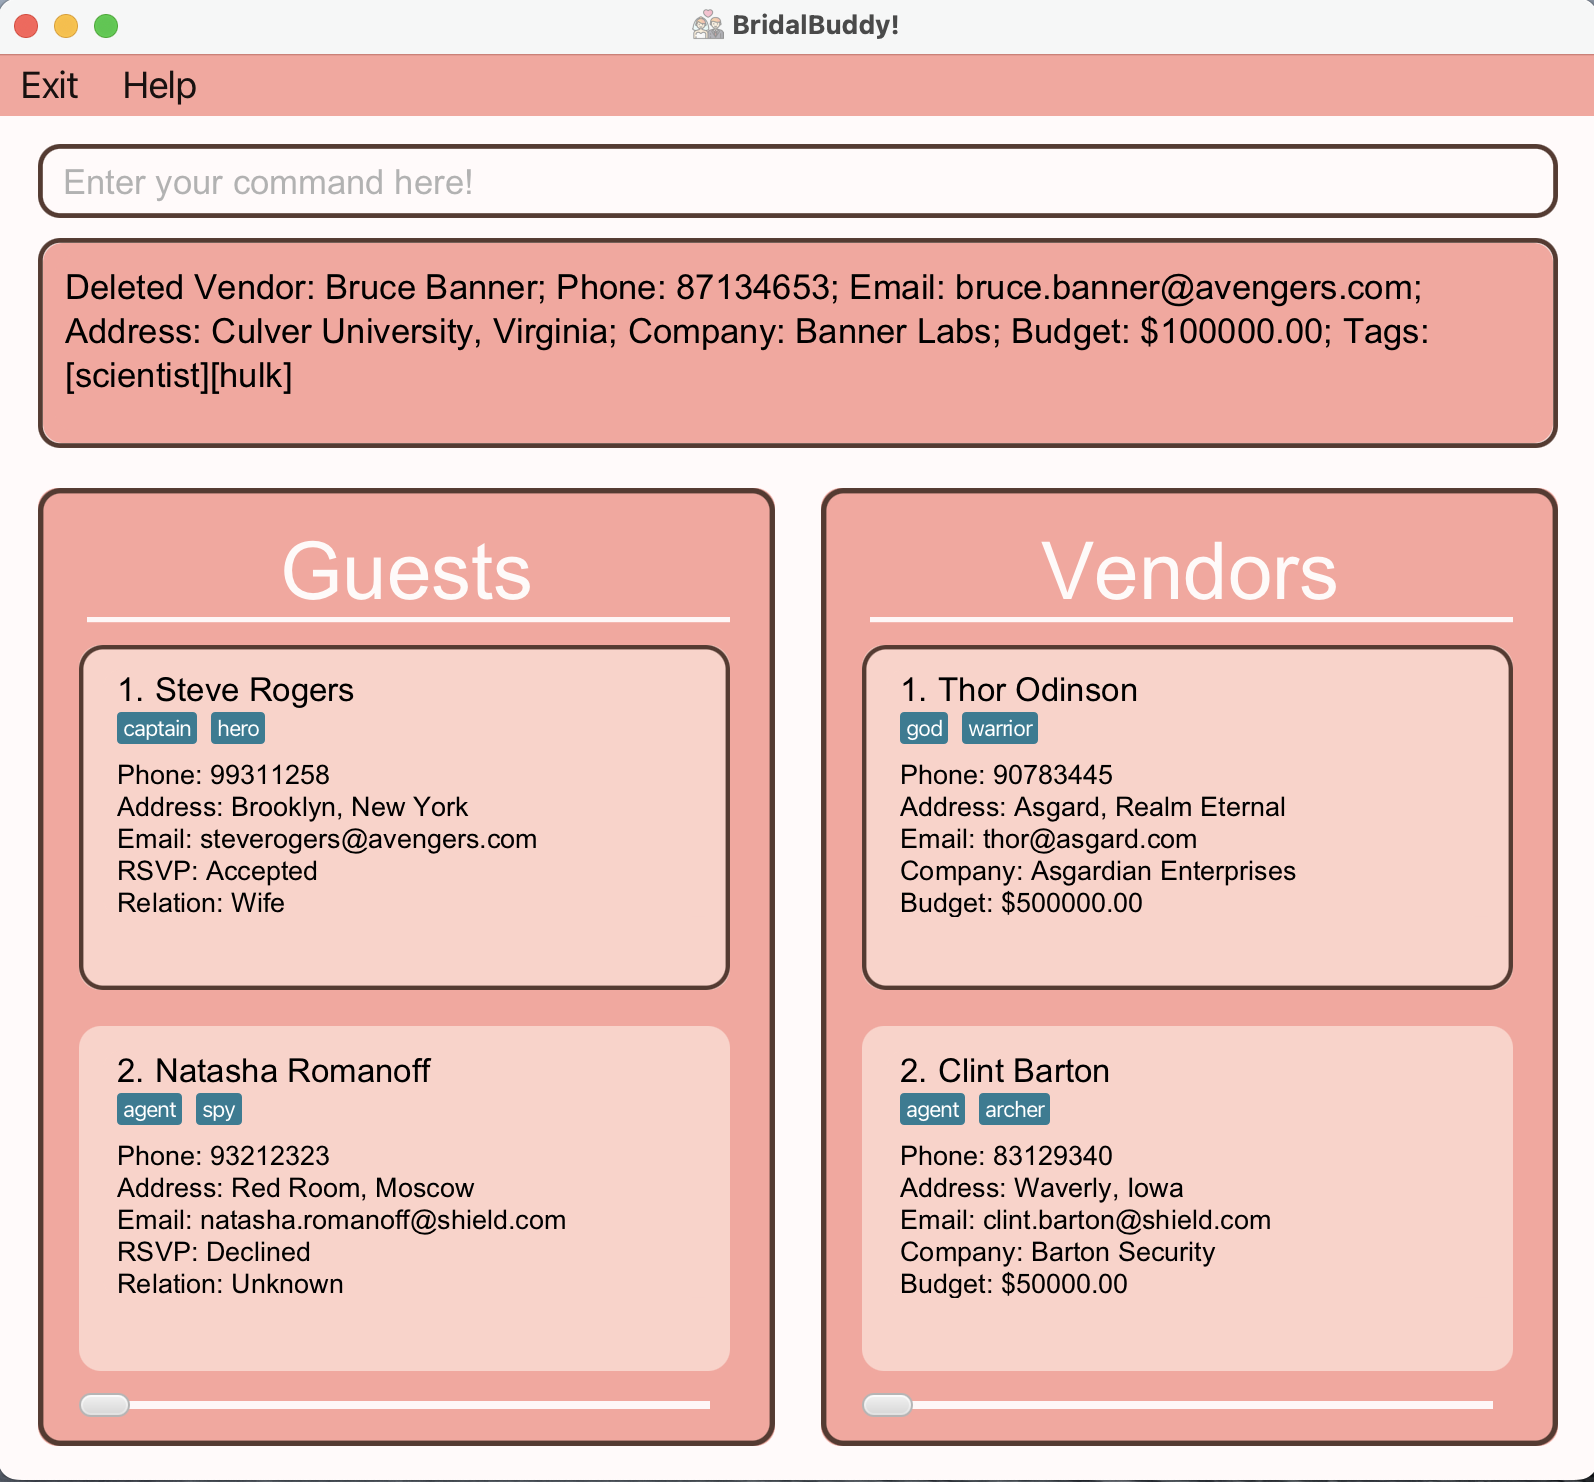
Assuming that Vendor Bruce Banner has an INDEX of 1 on the existing vendor list, entering the delete_vendor 1 command returns the following result on your screen:
Other Useful Features
Saving the data
You do not need to save manually as BridalBuddy data are saved in the hard disk automatically after any command that changes the data.
Editing the data file
BridalBuddy data are saved automatically as a JSON file [JAR file location]/data/bridalbuddy.json. Advanced users are welcome to update data directly by editing that data file.
⚠️ Caution:
If your changes to the data file makes its format invalid, BridalBuddy will discard all data and start with an empty data file at the next run. Hence, it is recommended to take a backup of the file before editing it.
Furthermore, certain edits can cause BridalBuddy to behave in unexpected ways (e.g., if a value entered is outside the acceptable range). Therefore, edit the data file only if you are confident that you can update it correctly.
FAQ
Q: How do I transfer my data to another computer?
A: Install the app in the other computer and overwrite the empty data file it creates with the file that contains the data of your previous BridalBuddy home folder. This file will be known as [JAR file location]/data/bridalbuddy.json.
Known issues
When using multiple screens, if you move the application to a secondary screen, and later switch to using only the primary screen, the application will open off-screen. The remedy is to delete the
preferences.jsonfile created by the application before running the application again.To avoid performance degradation, for now it is highly recommended that at most 300
Guests and at most 300Vendors are tracked in the guest list and vendor list respectively at any point of time.When inputting the
INDEXfor commands which require anINDEX, if theINDEXis larger than the 2147483647, anInvalid command formaterror message will be displayed instead of an error message specifying that theGuest/VendorINDEXprovided exceeds the number of guests/vendors (if applicable).Avoid parsing slashes
/in addresses or company names, such as inW/T Building, as they are misinterpreted as new prefixes.
Command summary
| Action | Format, Examples |
|---|---|
| Add Guest | add_guest n/NAME p/PHONE e/EMAIL a/ADDRESS [rsvp/RSVP] [r/RELATION] [t/TAG]... e.g., add_guest n/John Doe p/98765432 e/johnd@example.com a/311, Clementi Ave 2, #02-25 rsvp/A r/U t/friends t/owesMoney |
| Add Vendor | add_vendor n/NAME p/PHONE e/EMAIL a/ADDRESS c/COMPANY [b/BUDGET] [t/TAG]... e.g., add_vendor n/John Doe p/98765432 e/johnd@example.com a/311, Clementi Mall, #02-25 c/John's Florist b/1000 t/florist t/responsible |
| Edit Guest | edit_guest INDEX [n/NAME] [p/PHONE] [e/EMAIL] [a/ADDRESS] [rsvp/RSVP] [r/RELATION] [t/TAG]... e.g., edit_guest 1 p/91234567 e/johndoe@example.com |
| Edit Vendor | edit_vendor INDEX [n/NAME] [p/PHONE] [e/EMAIL] [a/ADDRESS] [c/COMPANY] [b/BUDGET] [t/TAG]... e.g., edit_vendor 1 p/91234567 e/johndoe@example.com |
| Delete Guest | delete_guest INDEX e.g., delete_guest 1 |
| Delete Vendor | delete_vendor INDEX e.g., delete_vendor 1 |
| Help | help |
| List | list |
| Find | find [n/NAME] [p/PHONE] [e/EMAIL] [a/ADDRESS] [rsvp/RSVP] [r/RELATION] [c/COMPANY] [b/BUDGET] [t/TAG] ...e.g., find n/James |
| Clear | clear |
| Stats | stats |
| Exit | exit |
Glossary
| Term/Keyword | Definition |
|---|---|
| Prefix | Characters preceding details you input on the command line. Eg. n/ for name and e/ for email. |
| JSON | JavaScript Object Notation, a lightweight data-interchange format for structuring and exchanging data |